Save time on image labeling using SentiSight.ai's range of AI-assisted image annotation services
Annotating images is a vital stage of training deep learning image recognition models, but it has often been a long, and labor intensive process. SentiSight.ai's Image Annotation services have been designed to speed up this process by offering a range of AI-assisted tools which enable capabilities that can be customized to meet your requirements.

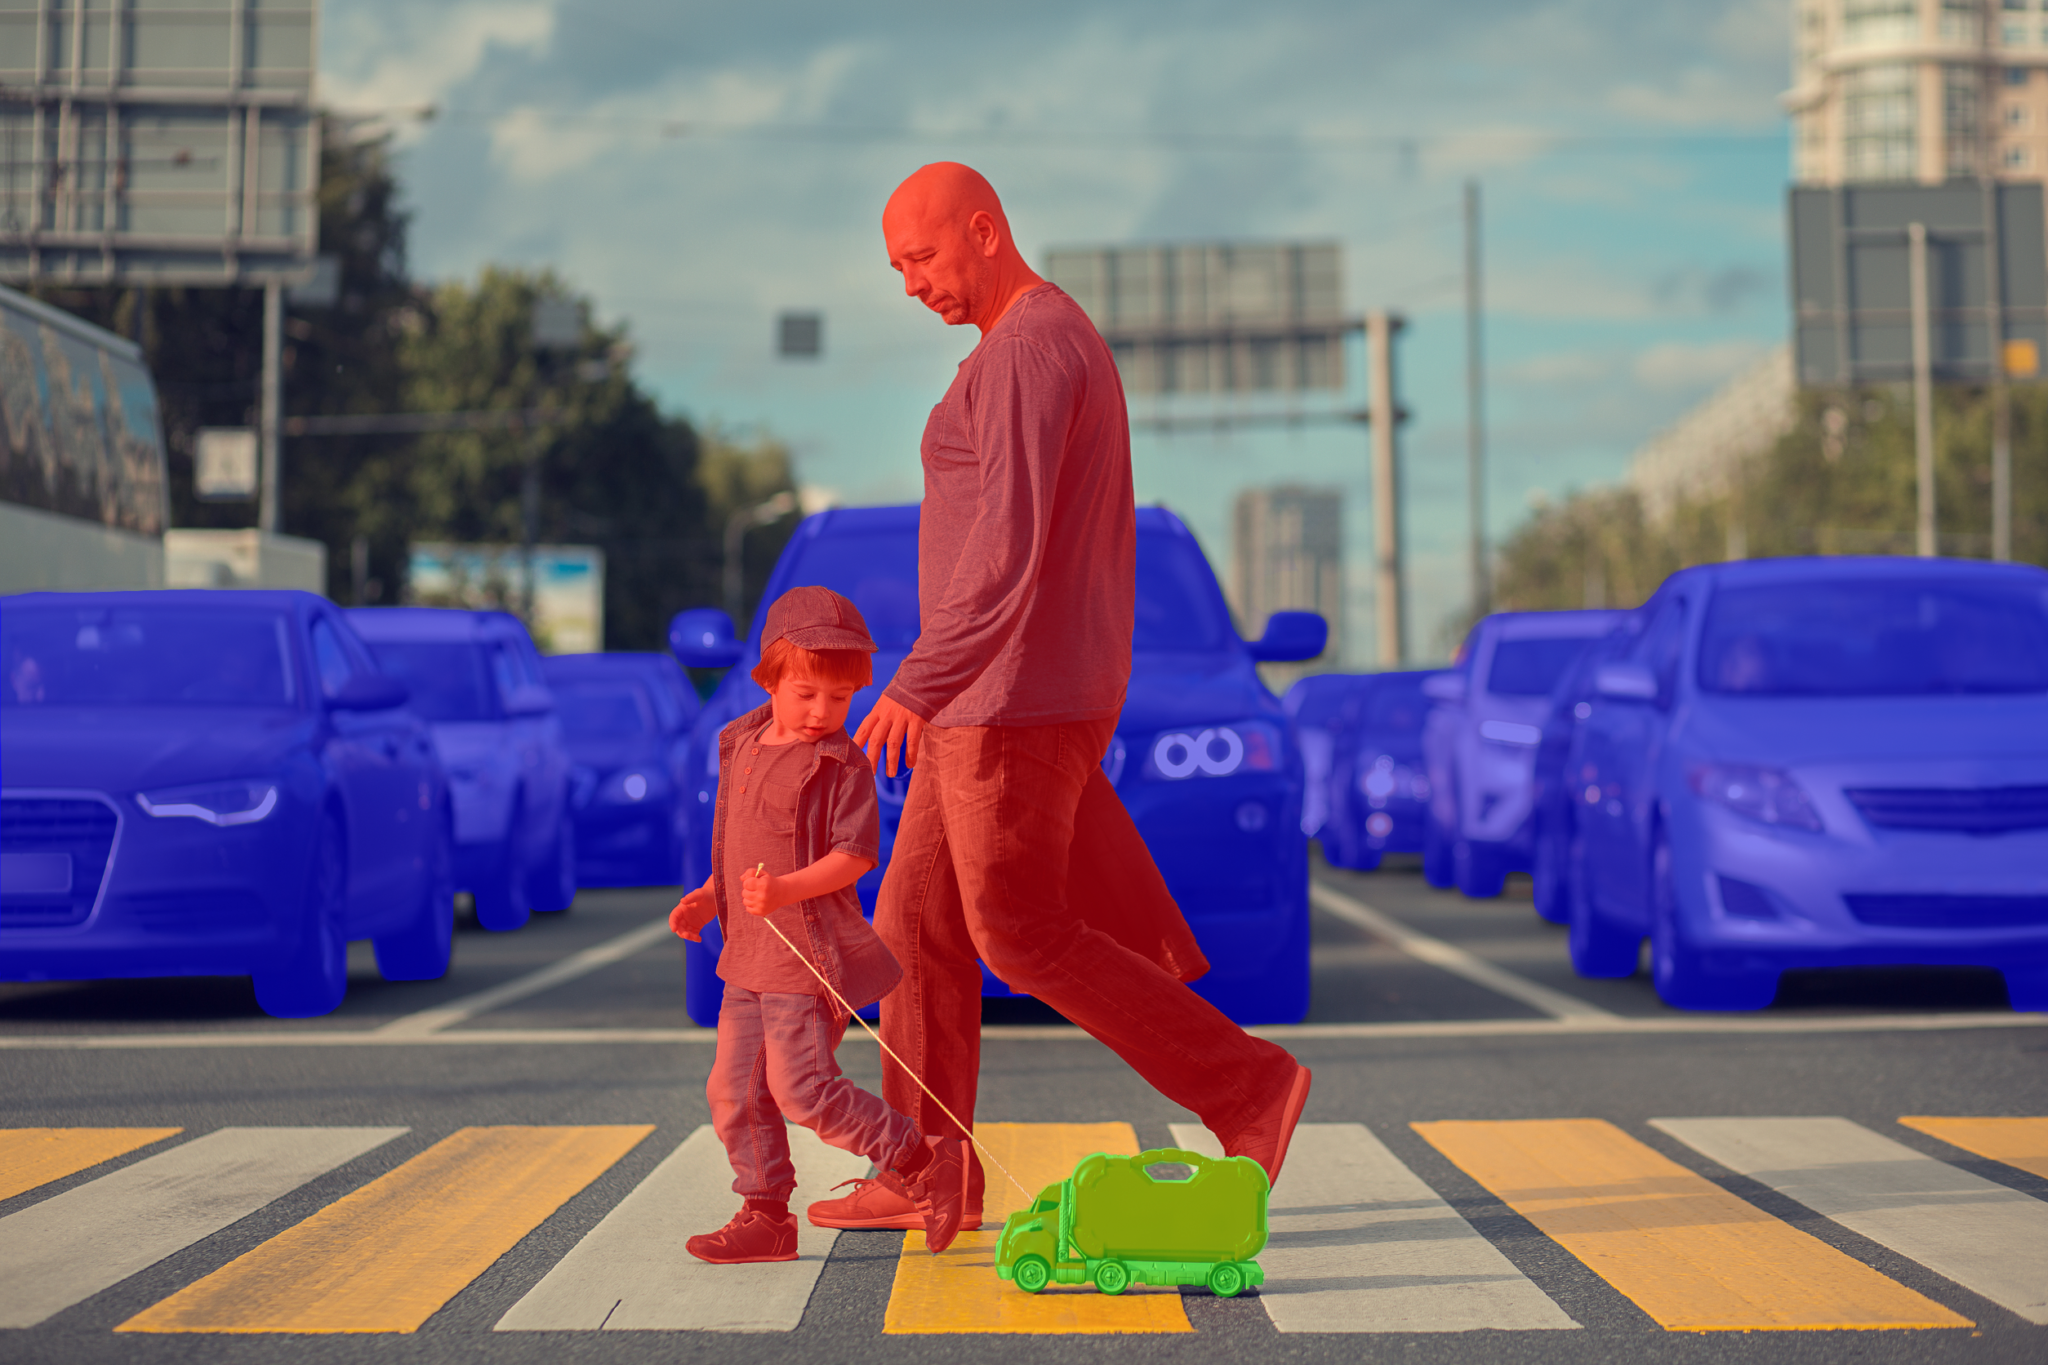
Image Annotation Service Capabilities
Image annotation is an essential part of the process for creating your own image recognition models. Use SentiSight.ai to annotate data for various models, including:


Simple to use yet powerful in capability, the image annotation tools are available for use on the SentiSight.ai online dashboard by all registered users.
Once created, these image labels can either be used on the SentiSight.ai platform or downloaded for offline use.
SentiSight.ai Image Annotation Tools
SentiSight.ai offers various AI tools to speed up image annotation process.
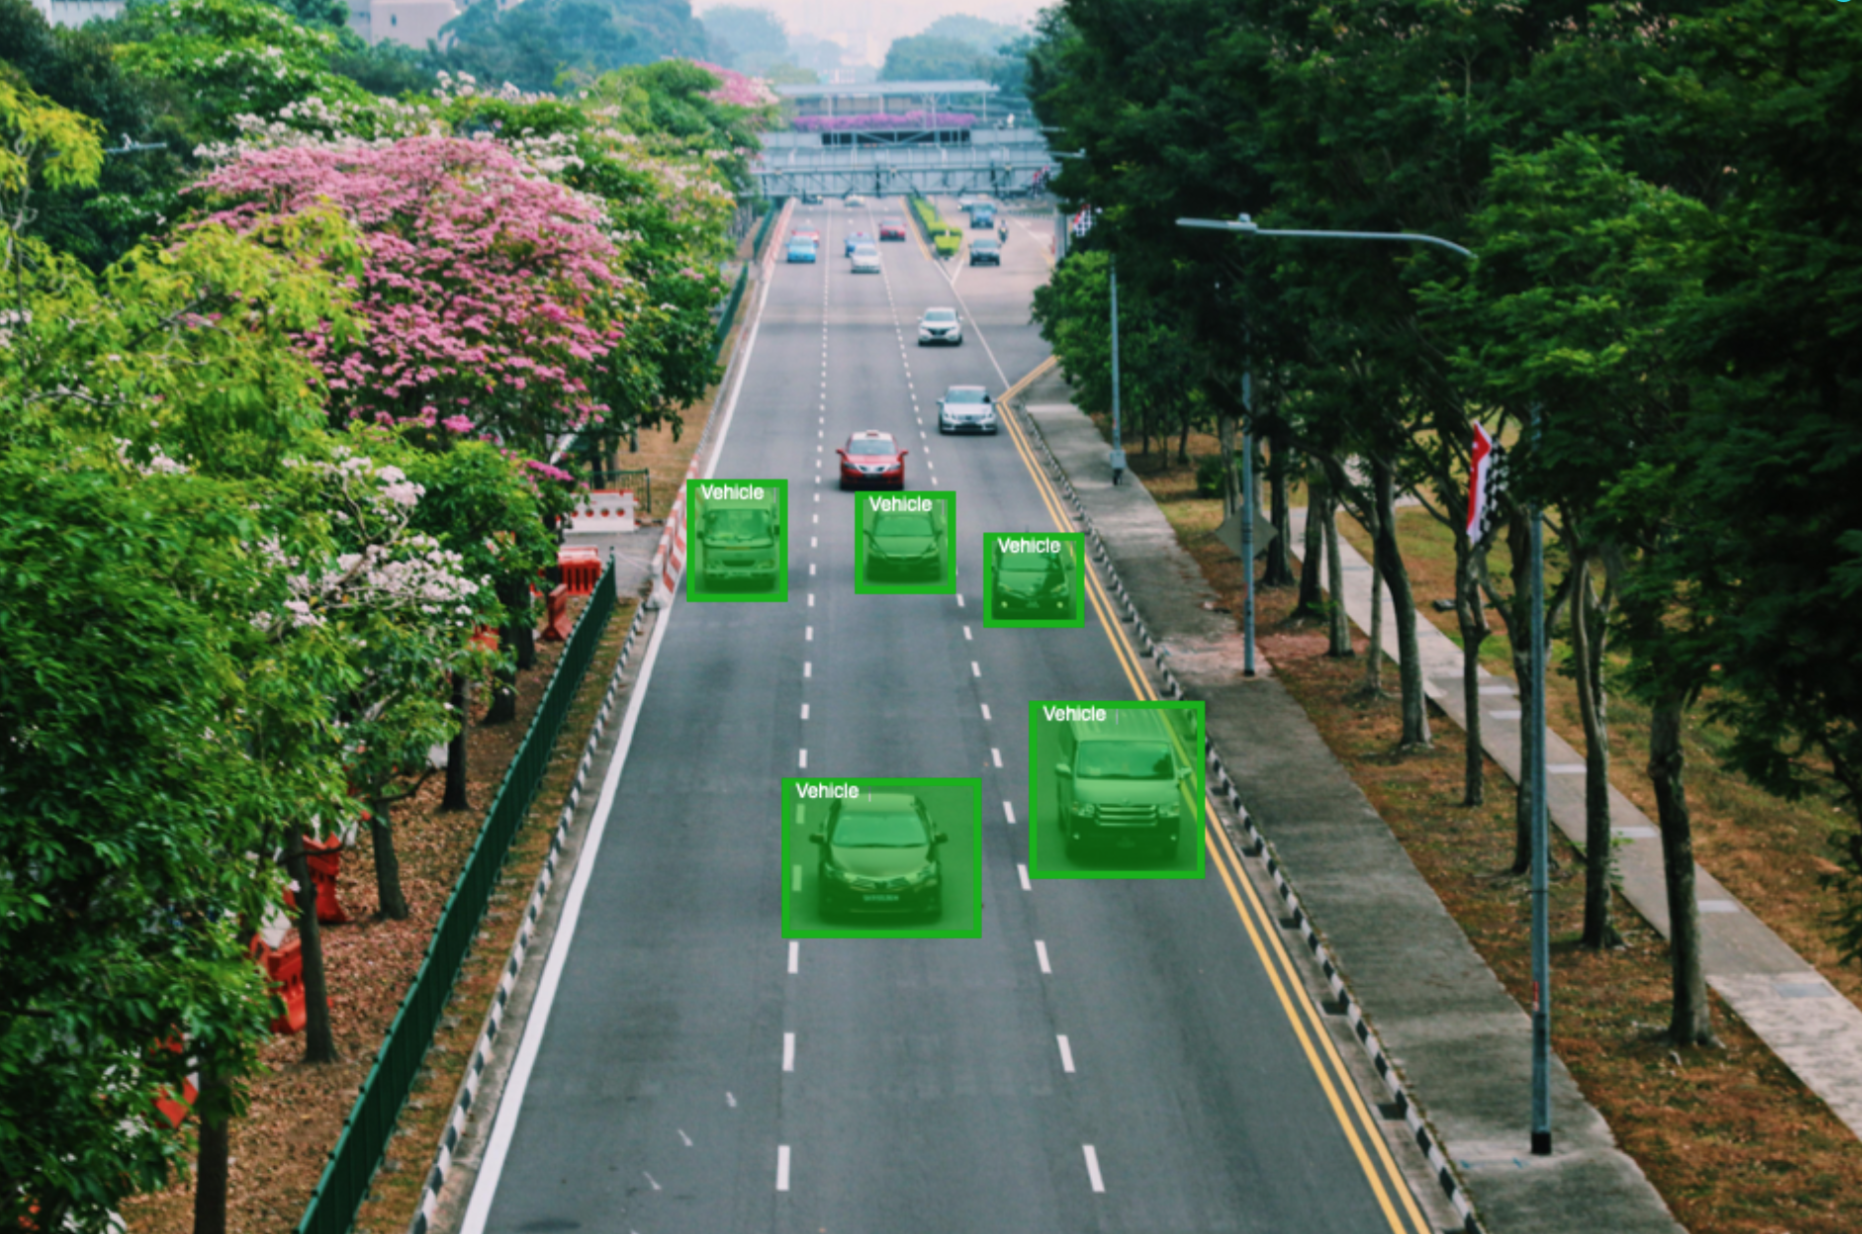
Bounding boxes can be used for object detection models. Additionally, users can add keypoints to bounding boxes.
For image segmentation, users can label either polygons or bitmaps. SentiSight.ai can be used to convert between the two.
Annotation project supervisors can use label evaluation tools to provide feedback to image annotators.
Annotate faster with AI-assisted Image Annotation Services
Additionally, classification labels can be annotated by a different AI-assisted process: using image similarity search. This method can be used without training a model, which means it is very convenient when you don't have a large amount of labeled data. The process looks like this:
- Annotate some images (at least 10 images per class is recommended, but as low as 5 can be used).
- Make an image similarity search. The algorithm will suggest labels for unlabeled images based on the most similar labeled images it finds.
- Review suggestions and make corrections if necessary.
- Add these images to your dataset.
Just like the process using trained models, this method can also be used for iterative labeling. Simply repeat steps 2-4, having more labeled images means better results of image similarity search.

AI can speed up the image annotation process immensely. The SentiSight.ai image annotation service allows you to use AI-assisted labeling with just several button clicks. Simply:
- Annotate a selection of images (for certain tasks, as low as 15 images might be enough).
- Train a classification or object detection model.
- Make predictions on unannotated images.
- Review predictions and make corrections if necessary.
- Add these images to your dataset.
This process can be repeated for iterative labeling. Increasing annotated image count in training dataset increases the accuracy of trained recognition models, which further speeds up AI-assisted labeling process.

Image annotation project management tools
Labeling time tracking
For users who want to calculate their employees’ time spent on a certain project and use this data to calculate project costs, salaries or bonuses.

Project sharing with user
role/permission system
Our system allows several users to label images in the same project, track their progress, manage their roles, permissions and much more!

Image filtering tools
SentiSight.ai offers a great variety of image filtering tools that allow filtering images by label type, by label name or by people who labeled or reviewed the image.

Track annotation progress
The project supervisor is able to see live image annotation progress of every user in his projects and give feedback about their labeling errors.
Book a Demonstration
If you are ready to get started with SentiSight.ai's image annotation service to access all of our available tools for whichever project you have in mind, then schedule a demonstration with one of our team to get a preview of our functionalities.
Managed human workforce for image annotation
Image labeling is a resource-heavy and lengthy process for machine learning models that require vast amounts of data. To make your journey into image recognition as smooth as possible, we have partnered with Biz-Tech Analytics to offer human-powered annotations.
Together with our partners, we offer text, image, and video annotation services to provide solutions tailored to your needs.
If you are interested in the human workforce for image annotation, please, contact us.

Image Annotation Service Webinar
Image Annotation Platform User Guides
Ensure you maximize your use of the SentiSight.ai platform for image annotation.
Our image annotation platform is a great place to develop and utilize image annotation skills for users of all abilities. With a vast array of tools available when it comes to annotating your images, we have produced user guides which help simplify the available processes and enlist all of the possibilities that can be unlocked on SentiSight.ai.
Our user guides surrounding image annotation comprises of:
1. Image Labeling
- Annotating images for classification: necessary for classification model training, add labels either through the web platform dashboard or image labeling tool. Also, learn how to set a desired default label to images that contain multiple labels.
- Image annotation for object detection and segmentation: get to grips with the different types of object labels such as bounding boxes, polygons and polylines, bitmaps and shared features like keypoints, rasterization, RPY etc.
- Smart labeling tool: make use of the advanced features to easily distinguish objects in the foreground from images with varying backgrounds including homogenous-looking backgrounds for instance.
- AI-assisted labeling: automate the manual process by correctly running predictions from your trained or pre-trained models, and view how running predictions differs from classification to object detection model training.
- Labeling by Similarity: speed up classification labeling without the need for model training.
- Settings: there is a broad range of customization options on SentiSight.ai such as overriding labels when uploading JSON and disabling smoothing when zoomed in.
2. Labeling Project Management
- Project sharing and user management: add users to your biggest projects and alter user permissions so each team member on your account has a designated role within the project.
- Project manager window: learn to filter through all of your projects and create, rename and delete projects from your dashboard.
- User responsibilities: supervise your team's efficiency on tasks through either the main project dashboard or management window, as well as add new slots to projects and learn how to create more once you have reached the default limit.
- Uploading: already existing annotations for images can be uploaded as a .csv, .json, .png or .zip - ensure a correct upload by following the steps for each.
- Download labels: whether it's for your in-house model training or separate projects.
- Image filtering: our platform allows users to filter images by type, label and image status. Learn more about the benefits of each filter and how they can improve your project management.
Both sections enlisted above contain links to video tutorial pages in case seeing the platform in action by one of our esteemed team members helps you to become more acquainted with SentiSight.ai’s image annotation.
Image Annotation Video Tutorials
Labeling tool tutorial
Topics covered:
- Labeling bounding boxes, polygons, bitmaps
- Adding keypoints and attributes
- Converting bounding boxes and polygons to bitmaps and vice-versa
- Labeling occluded objects
- Using smart labeling tool
- Downloading and uploading image labels
You can download video tutorial here
Video transcription:
To label bounding boxes, first click on the bounding box tool on the left hand menu, or click B on your keyboard. Then, simply draw a bounding box around the objects in the image that you would like to label. To enter the label name for an object, enter the text on the right hand side menu either by typing the name in manually, or by selecting it from the dropdown menu.
Once you have placed the bounding box on the image, you can resize or re-position the box as is necessary.
If you want to add a new bounding box on top of an existing bounding box, you can do so by clicking ‘New Object’ or N on your keyboard, and then draw the new bounding box. You can use a shortcut to change the label names of different bounding boxes by using the numbers on your keyboard. You are able to change which number corresponds to which label in the settings, to create shortcuts when labeling.
To label polygons, switch to the polygon tool. Then, click on the image where you want to add points to the polygon. To finish the polygon, click on the original point of the polygon, or press enter on your keyboard. Once you have made your polygon, you can adjust the points of, or add new points to your polygon. To delete vertices on the polygon, either click on the delete button (on the right hand side) or click r, and then click on the vertex point. If you want to delete the whole polygon, you can do so by clicking on the middle of the polygon.
You can add holes to your polygon as well. To do so, click on the ‘New Hole’ feature (on the right hand side) or click H on your keyboard. Then, draw the hole inside the polygon. These holes can also be moved, resized or new points added.
Another useful feature is the possibility to add key points to an object. Once you have drawn the bounding box, click on the ‘Add keypoints’ button on the right hand side, or click K on your keyboard. Then, click on the position where you want to add a keypoint and enter its name. Afterwards, you can add a few more keypoints and enter their names.
Once you have added the key points for that object, you can click on the save icon to save key point template. This will mean that for future objects of the same name, the key points labels will automatically appear in the same sequence as for the original object.
Additionally, you can add attributes for your labels. Click on the Attributes tool to add an attribute to the contents of the label. For example, if you were labelling human faces, you can add attributes such as Gender and Hair Colour to the labels.
It is possible to add keypoints and attributes to both bounding boxes and polygons.
In addition to polygons, you can also label bitmaps. To draw bitmaps, click on the bitmaps tool on the left hand side. Then, draw a bitmap around your object in the image. You can resize the bitmap brush size on the right hand side menu. You can also use the Fill feature (G on your keyboard) and Erase feature (R on your keyboard) .
These bitmaps can be converted to polygons, and vice versa by clicking on the button on the right hand side menu. You can change the number of points that appear on the polygon once converted from the bitmap in the settings by checking or unchecking the “Simplify polygons converted from bitmap”. If this option is not ticked, it will increase the amount of points on the polygon.
Bounding boxes can also be converted into bitmaps, by clicking on the ‘Rasterize all objects’ option on the right hand side.
In order to speed up the bitmap labeling process, you can use the smart labeling tool.
To use the smart labeling tool, first select the area that you want the tool to be active on the image. Then, click on the ‘foreground’ button on the right hand side, and quickly draw a bit of the foreground of the object. Once that is done, then click on the ‘background’ button, and quickly draw a bit of the background of the image. After this, you simply click on ‘Extract’ on the right hand side, and the smart labeling tool will automatically extract the object from the foreground that you draw. You can click on extract again and the result will change slightly. To improve the automatic extraction, you can use the foreground tool again to highlight more of the object in the image. Where the contract is high between the foreground and background, the smart labeling tool is very effective. Where the contrast difference is lower, the smart labeling tool is not as effective. In these instances, it is easiest to click ‘done’, and then zoom in and use the draw feature (E on your keyboard) to finish the bitmap manually.
Once you are done labeling your image, you can download your image labels by clicking on the download button on the left hand side. Once you have clicked on the button, you can then choose which labels you want to download.
In the downloaded zip file; -you will find a json file with all of the image labels such as polygons, bounding boxes, polylines and points - classification labels in csv format -original images - the bitmaps, in two versions, both the coloured version which can be used for semantic segmentation or the black and white version which can be used for instance segmentation (it has a separate black and white bitmap for each object listed)
If you want to download labels for all images, you can do so by clicking the ‘Select all images’ button, then right click on any image, and then click on the download button. You will be presented with the same download options as before.
Managing labeling projects tutorial
Topics covered:
- Sharing projects
- Managing roles and permissions
- Tracking image labeling time
- Filtering images
- Reviewing labeled images
- Labeling settings
You can download video tutorial here
Video transcription:
Once you have added users to your projects, you can manage their Roles and Permissions, by clicking on the User Settings button, and then on ‘Edit Roles’.
You can choose between Project Owner, Labeler, Developer or Admin.
Once you have chosen a role, you can choose from a list of User privileges, including;
- Adjust validation set
- Classification Model Training
- Delete Image
- Delete Project
- Download Image labels
- Download Model
- Edit Image
- Edit project settings
- Edit User Roles
- Filter Images by user
- Image Download
- Image labeling
- Image Upload
- Object Detection Model training
- Prediction
- Project Sharing
- See labeling time
- Segmentation model training
- Similarity Search
SentiSight tracks how long each user has spent labeling images. To see the labeling times, click on the Person Icon on the top right corner, and then click on ‘See time’ next to the Labels Made Feature. This information will show the labeling time per user per day, as well as summaries displaying Total Labeling Time per user per project.
You can filter the data and labeling time by a user basis, project basis, or by the start and end date. You can download these user labeling time statistics as csv files.
SentiSight has a range of ways to filter images to help you with your labelling. You can Filter by Type (left hand menu), and choose from options such as Contains Object Labels, or not.
You can also filter images by their label name, choosing from either classification labels, object labels, or All.
Finally, you can choose to “Filter by image status” which allows you to filter images by whether they have been Seen By and Labeled By particular users, to help with project management.
A new feature on SentiSight is the ‘eye’ icon that appears on the top right corner of the images, that indicates whether the image has been seen by you or not, making it easy to understand your reviewing progress. You can manually choose to set an image as seen or unseen by right clicking on the image and selecting the relevant option. You can select multiple images at once and set their seen or unseen status in the same way.
There are a range of labeling settings that you can choose from. Simply click on the settings icon in the top right corner, and then choose labeling from the menu.
You can select the Synchronize labels option, which means that whenever you are adding an object label, this will also appear as a classification label.
Users are also given the option to Skip already labeled images to help speed up the labeling process. Note that this option is now replaced by “Skip other user images”, because sometimes it is convenient to come back to the previous images that you labeled yourself.
Labeling images for classification
Topics covered:
- Labeling images during the upload
- Adjusting the labels after the upload
- Changing the default label for the image
You can download video tutorial here
Video transcription:
You can remove labels once they have been added, simply by clicking on the X button on the image to remove a label from an individual image. To remove the label from multiple images, select the images, and then click on the minus button next to the relevant label on the left hand side.
To add the label to multiple images, select the images, and then click the + button on the left hand side.
Users can easily add new labels which were not previously in the dataset. To do this, type in the name of the desired label in the left hand side text box, and then click on add. Follow the same instructions as above to add this classification label to images.
You can remove a label from the whole dataset if required. This will remove the label from all images containing it. To do this, click on the dropdown icon next to the label on the left hand side, and then click on the Remove Label option.
Each label has a colour associated with it. Whilst this colour is primarily for object detection and segmentation labeling. To change the colour of the label, click on the third icon next to the label name, and then select the new colour from the option list.
Use the SentiSight.ai Image Annotation Service yourself
To get started using the SentiSight.ai, simply register for a free SentiSight.ai account and head over to the dashboard to get started!
Pricing Summary
SentiSight.ai is supported by a pay-as-you-go wallet based system that allows users to pay for only what they use, maximising flexibility and value for money. New users get €20 of free credits when you sign up for a SentiSight.ai account. Every user receives €5 a month of free credits for use on the platform. There is no need to enter your billing information to receive these free credits. Therefore, the SentiSight.ai platform can be completely free to use if you do exceed the €5 monthly free credit buffer.
The cost to use the Image Annotation tool are as follows;
| Pricing Range | 0-10,000 labels | 10,001 - 100,000 labels | 100,000+ labels | |
|---|---|---|---|---|
| Image Labeling* | € 0.0005 - 0.001 | € 0.001 / label | € 0.0008 / label | € 0.0005 / label |
* The listed prices are for labeling self-service. If you are interested in a managed human workforce for image annotation, please, contact us.
For full details of SentiSight.ai’s pricing model, including project management features and extra disk space, please visit the Pricing Page.
Image Annotation FAQs
Image Annotation
Labeling Tool
- Select a rectangular area of work for the tool
- Mark foreground. A few lines is enough for clear, contrasting backgrounds in the image. For regions with complex colors that may blend with the background it might be better…
- Mark background.
- The Smart Labeling tool will predict the object bitmap based on the foreground and background parts that you marked. If some of the marked bitmap is incorrect you can adjust the foreground and background markings so that the smart labeling tool could adjust its predictions. Repeat steps 2-3 until you are happy with the outcome.
- Press Done once you are finished. The bitmap tool can be used to make additional touch ups.
Contents
- Save time on image labeling using SentiSight.ai's range of AI-assisted image annotation services
- Image Annotation Service Capabilities
- Annotate faster with AI-assisted Image Annotation Services
- Image annotation project management tools
- Managed human workforce for image annotation
- Image Annotation Service Webinar
- Image Annotation Platform User Guides
- Use the SentiSight.ai Image Annotation Service yourself
- Image Annotation FAQs