Project Management
SentiSight.ai offers a wide selection of tools to navigate and manage your image annotation projects - including flexible filters, ability to download and upload labels, as well as project sharing with configurable roles and permissions.
Project sharing & user management
Large-scale projects often require multiple people working on them. For instance, to label large amounts of images you might want to assign a few dedicated labelers, or have a dedicated user review labelers' work.
In SentiSight.ai you can share your projects with other users, allotting them limited permissions to interact with the project, so that they can perform their duties without messing anything up. You can also check their labeling times and statistics to evaluate their efficiency.
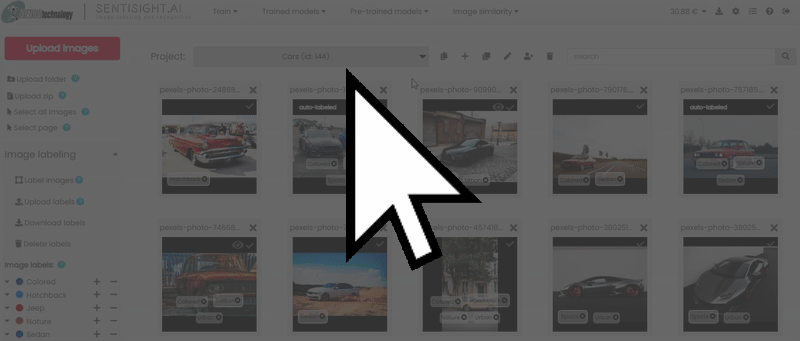
The most basic way to do it is through the main project window. Just click on the Share Project button near the project name and enter the email address of the user you want to share the project with.
This will add them to the project and grant them the default role of a Labeler.
You can then click on the User permissions button that appears as soon as a project has more than one user, to assign a desired role to the user.
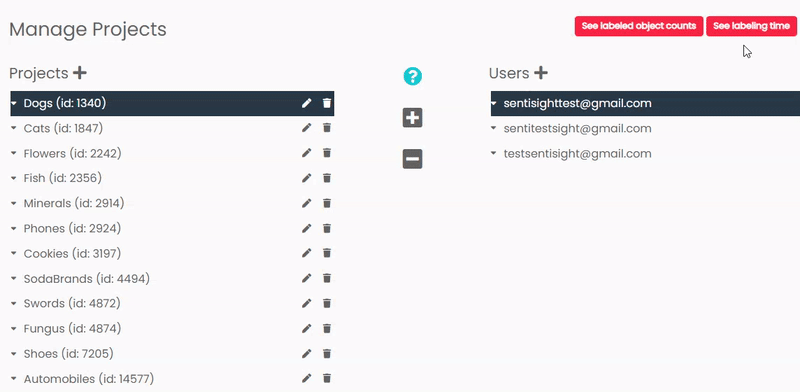
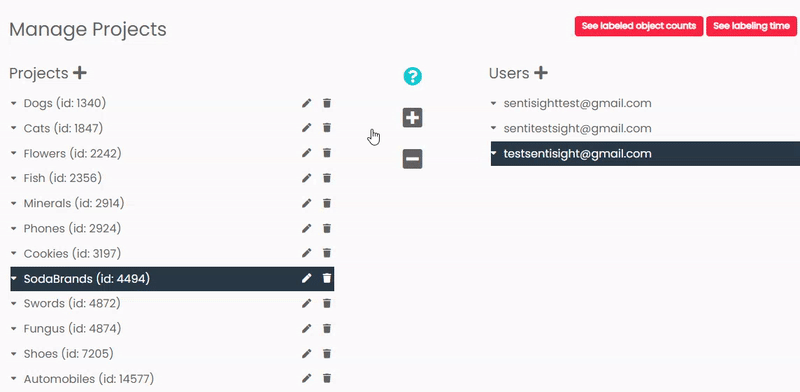
Project Manager Window
The method described above is the most basic.
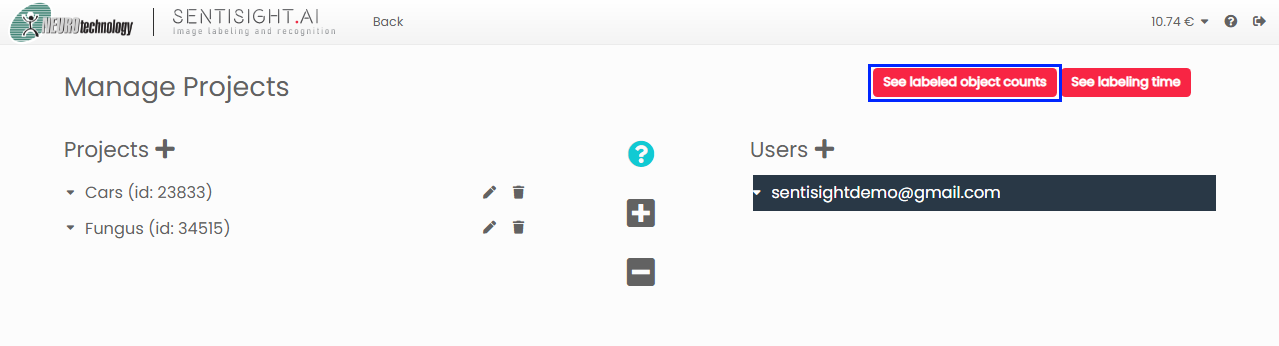
For in-depth management of multiple projects with multiple users, SentiSight.ai offers the project manager window.
In it you can see the list of all projects you own or are participating in on the left and the list of all users participating in any of those projects on the right.
Clicking on any project on the left expands the list of users participating in it, complete with their roles.
Clicking on any user on the right expands the list of projects they are participating in.
The + and - buttons allow easy addition or removal of users to projects (provided you have the necessary permissions, of course).
In addition, you can create, rename and delete projects from this window, allowing you quick and easy control of your work.
See below for examples and in-depth description of the features.
Select a user and a project and click on + to add them to a project and on - to remove them from one.
 .
.You don't have to select users or projects one by one. You can select multiple projects and/or users at the same time to quickly add (or remove) them to multiple projects.
User Permissions
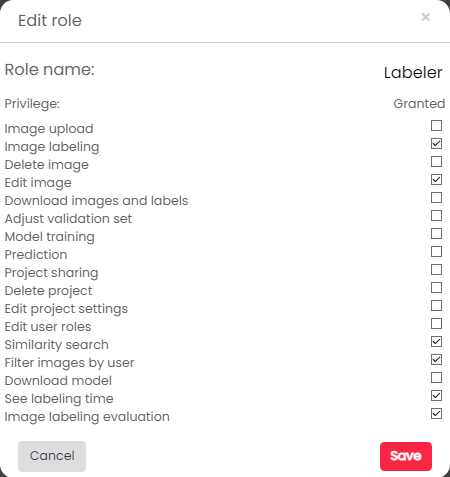
In order to define the access level of users in your projects, SentiSight.ai offers a system of user permissions.
While default roles - Labeler, Developer and Admin - cover most needs, you might want to edit them or create your own user roles.
User roles can be accessed by clicking on a relevant button in Project Management Window, or on ![]() button to the right of shared project's name in the main dashboard.
button to the right of shared project's name in the main dashboard.
After opening User roles window, click on Edit permissions button.
Click on + to create a new role or on a pencil button to edit an existing one.
This will bring up the permissions window, allowing you to grant or take away permissions from a role.
User Shares Limit
There is a limit to how many users you can add to your projects.
Each user added takes up one user share but can be added to as many projects as you want.
By default you are granted two free users shares and can purchase more. Keep in mind that one share is always for the user themselves. You can read more about it here.
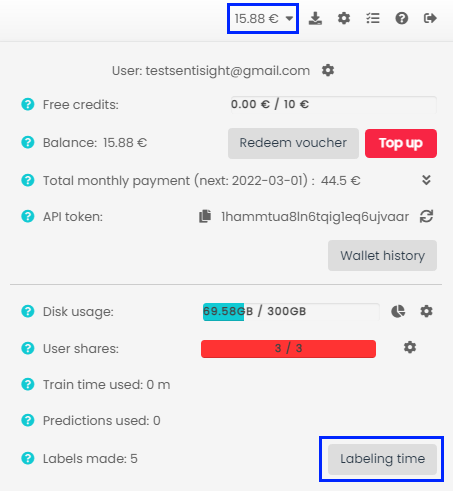
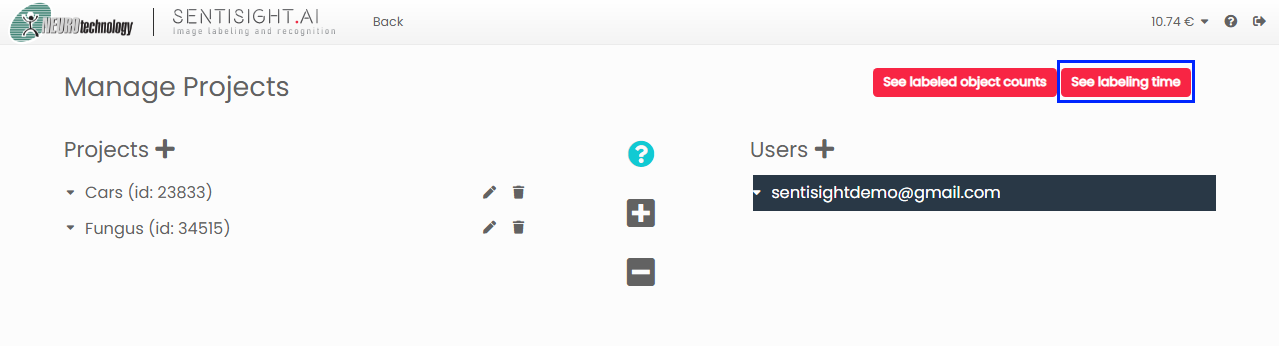
User times
In order to supervise your labelers' efficiency, you can see the labeling times of users in your project. They can be accessed both from the main project dashboard and from the project management window. See images in the tabs below on how to find them.
Open your Wallet info and click Labeling times.
Click on Labeling times in the top right corner of the window.
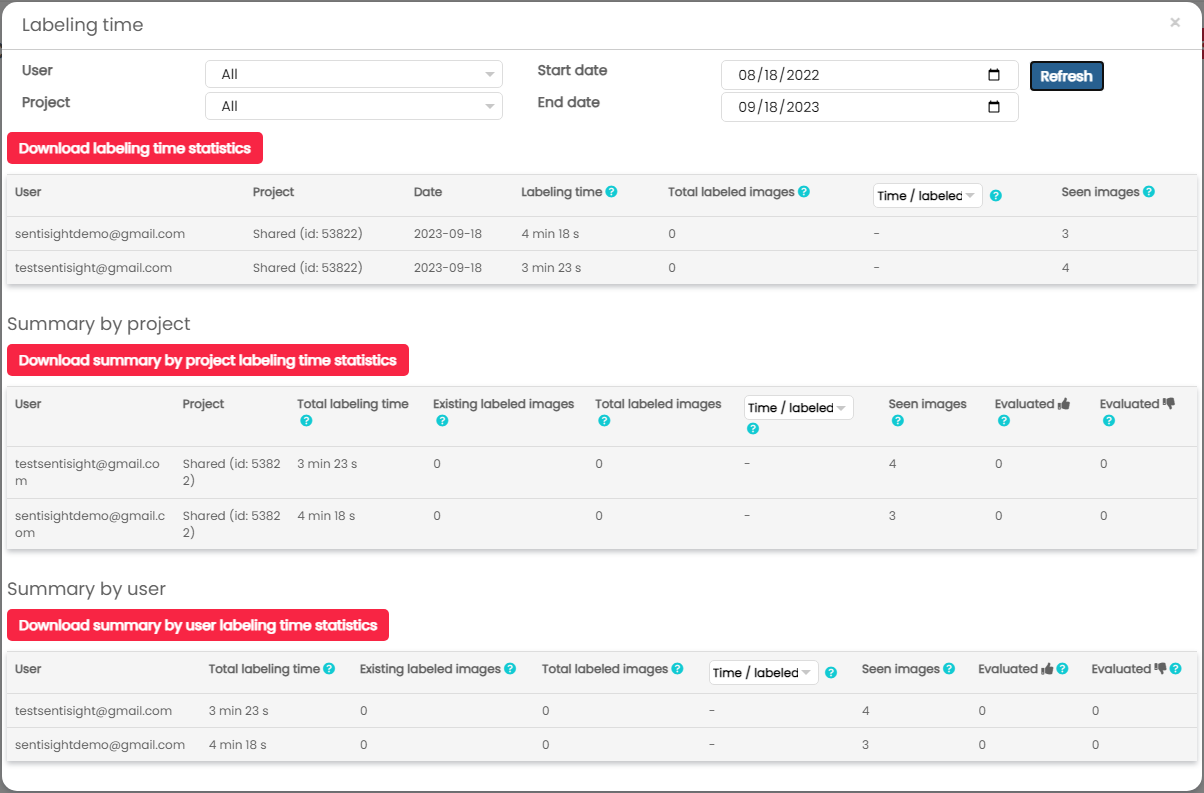
Opening labeling times from either page will open a dialog in which you will see three tables with data within the chosen time period: the first table provides labeling statistics grouped by day; the second table provides the users' time spent on labeling grouped by project, while the other provides the total labeling time spent by each user. You can filter the tables by a certain user or project and download the filtered times as a .csv file. The second and third tables also provide statistics of how many images belonging to each user or project have been evaluated positively or negatively.
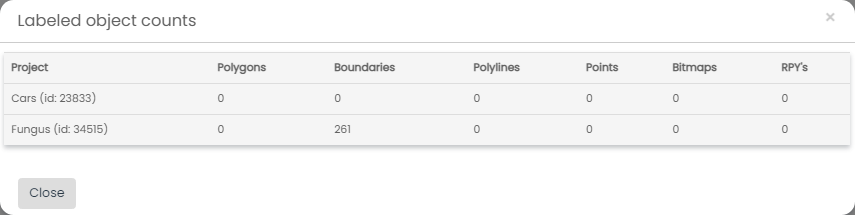
Labeled object count
Another important statistic you can access from the project management window is the number of object labels created across all of your projects.
Click on See labeled object count button in the top right corner of the project management window to bring it up.
Evaluation
A user with Image labeling evaluation privilege can evaluate images labeled by other users, indicating whether the image was labeled correctly or if mistakes were made.
In the top right corner of the labeling tool window you can find the "thumbs up" and "thumbs down" buttons which assign an evalutation to the image.
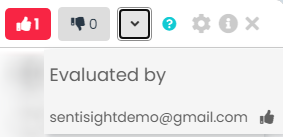
A dropdown button shows all users that have evaluated the current image.
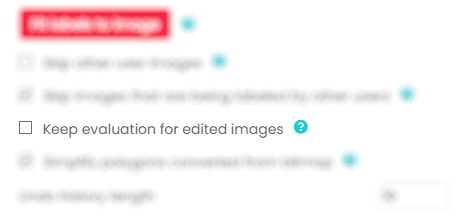
By default, evaluations are cleared when a user makes a change to the image.
You can change it in the Labeling tab of the project settings.
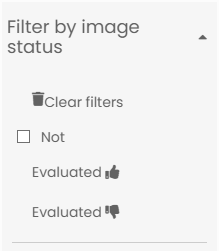
You can filter images by evalutation in the project window.
General project management tips
If you have multiple labelers, it is generally advisable to create a separate project for each labeler, so their jobs do not overlap. That way it is easier to track progress and review their work. So the most common case would be that the project has two users: the project supervisor (you) and the labeler.
One exception to this rule is when you want labelers to peer review each others work. In that case, it is ok, to have two or more labelers in the same project besides the project supervisor.
If you still want to have multiple labelers labeling images in the same project (not just reviewing), you can also do that. In that case, consider turning on the following settings (found under Labeling tab in the Settings interface, accessed by clicking on ![]() button in the top-right corner of the main project dashboard.
button in the top-right corner of the main project dashboard.
- Skip other user images - if checked, images that have been labeled by other users won't open in another user's labeling tool.
- Skip images that are being labeled by other users - if checked, images that are opened in some users' labeling tool(s) won't open in others'.
For tracking the progress of which images have already been labeled or reviewed, it is very useful to use image filters. See Image filtering section.
Uploading labels
If you have labels for your images created in some other image annotation tool, you can upload them to SentiSight.ai, as long as they use the correct format (see below). This will allow you to quickly continue your work using our platform.
When you have image annotations that you want to upload to the SentiSight.ai platform, click the Upload labels button in the left panel and choose the type of file you want to upload. Note that the file needs to have a suitable format for the platform.
Uploading image classification labels as a .CSV
The first field in each row should be the filename of the image, and the rest of the fields should be the image labels. The file extension in the first field can optionally be skipped. In the case of multi-label classification, the number of fields in each row might be different, because each image might have a different number of labels. Here is an example of an annotation file for image classification as .CSV.
Uploading all image labels as a .JSON
Please see below for the correct format of the JSON files for various label types.
Some fields are optional. They can be safely left empty or not included at all.
In addition to the optional fields listed below, downloaded JSON files might include such fields as project ID, image height, and image width. These fields are likewise optional and serve only informational purpose.
- name - image name
- mainClassificationLabel - single label that acts as the image's default label for the purpose of single-label model training
- classificationLabels - array of assigned classification labels
[
    {
        "name": "image_name.jpg",
        "mainClassificationLabel": "label1",
        "classificationLabels": [
            "label1",
            "label2"
        ]
    }
]
- name - image name
- boundingBoxes - array of bounding boxes
- label - label of the bounding box
- occluded - whether the object is obstructed by another object; optional
- x0, y0 - coordinates of the top left corner of the bounding box
- x1, y1 - coordinates of the bottom right corner of the bounding box
- attributes - array of attributes; optional
- keypoints - array of keypoints; optional
[
    {
        "name": "image_name.jpg",
        "boundingBoxes": [
            {
                "label": "boundingBox1",
                "occluded": false,
                "x0": 342,
                "y0": 359,
                "x1": 565,
                "y1": 537,
                "attributes": [
                    {
                        "name": "attribute1"
                    },
                    {
                        "name": "attribute2"
                    }
                ],
                "keypoints": [
                    {
                        "name": "keypoint1",
                        "x": 456,
                        "y": 394
                    },
                    {
                        "name": "keypoint2",
                        "x": 383,
                        "y": 499
                    }
                ]
            }
        ]
    }
]
- name - image name
- polygonGroups - array of polygon groups
- label - label of the polygon group
- occluded - whether the object is obstructed by another object; optional
- polygons - array of polygons within the polygon group
- hole - whether the polygon is a hole within another polygon
- points - array of points of a polygon
- x, y - polygon's point coordinates
- attributes - array of attributes; optional
- keypoints - array of keypoints; optional
[
    {
        "name": "image_name.jpg",
        "polygonGroups": [
            {
                "label": "label1",
                "occluded": false,
                "polygons": [
                    {
                        "hole": false,
                        "points": [
                            {
                                "x": 838,
                                "y": 692
                            },
                            {
                                "x": 896,
                                "y": 542
                            },
                            {
                                "x": 1358,
                                "y": 620
                            }
                        ]
                    }
                ],
                "attributes": [
                    {
                        "name": "attribute1"
                    },
                    {
                        "name": "attribute2"
                    }
                ],
                "keypoints": [
                    {
                        "name": "keypoint1",
                        "x": 934,
                        "y": 614
                    },
                    {
                        "name": "keypoint2",
                        "x": 962,
                        "y": 584
                    }
                ]
            }
        ]
    }
]
- name - image name
- polylines - array of polylines
- label - label of a polyline
- occluded - whether the object is obstructed by another object; optional
- points - array of points of a polyline
- x, y - point coordinates
- attributes - array of attributes; optional
[
    {
        "name": "image_name.jpg",
        "polylines": [
            {
                "label": "label1",
                "occluded": false,
                "points": [
                    {
                        "x": 286,
                        "y": 897
                    },
                    {
                        "x": 1063,
                        "y": 949
                    }
                ],
                "attributes": []
            }
        ]
    }
]
- name - image name
- points - array of points
- label - label of a point
- occluded - whether the object is obstructed by another object; optional
- x, y - coordinates of a point
- attributes - array of attributes; optional
[
    {
        "name": "image_name.jpg",
        "points": [
            {
                "label": "label1",
                "occluded": false,
                "x": 801,
                "y": 874,
                "attributes": []
            },
            {
                "label": "label2",
                "occluded": false,
                "x": 314,
                "y": 762,
                "attributes": []
            }
        ]
    }
]
Uploading color bitmaps as a .PNG
A bitmap image should have a black background with each color representing a different object. Same color pixels will be assigned to one object. See the example below:
Uploading B/W bitmaps as a .ZIP
Each bitmap image should have a black background with objects colored white. The zip should contain a folder named 'bitmaps' which has the following structure: image_name/label_name/object_bitmap.png . See this example.
Dowloading labels
If you want to use the labels you made to upload them to another project, or for your in-house model training, you can download them easily.
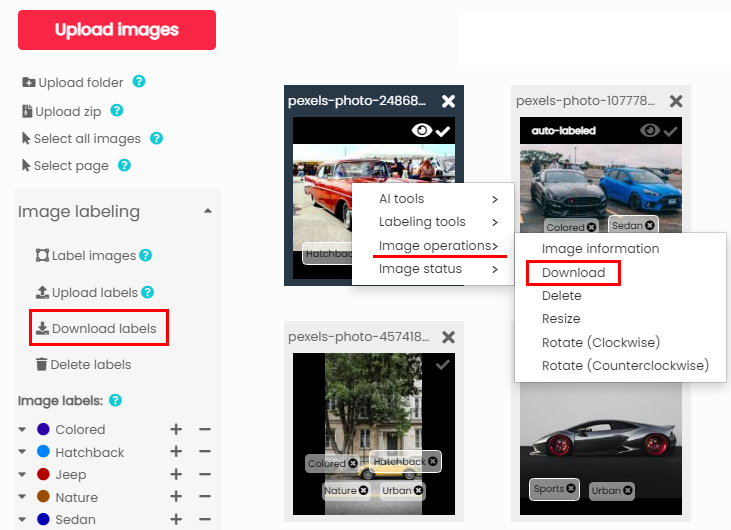
You can open the download menu either from the left-hand dashboard in the project window, or by right-clicking on the window and going Image operations - Download.
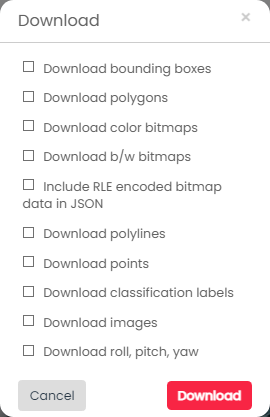
Either of these options will bring up the Download menu, where you can select what kind of data you want to download from your project and click Download.
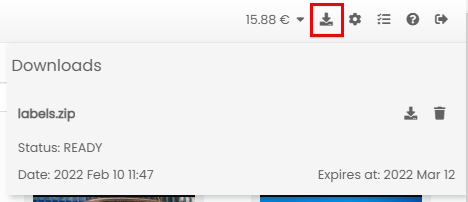
Afterwards, you can see and re-download any of your downloads in the download drop-down in the top right corner of the SentiSight.ai page.
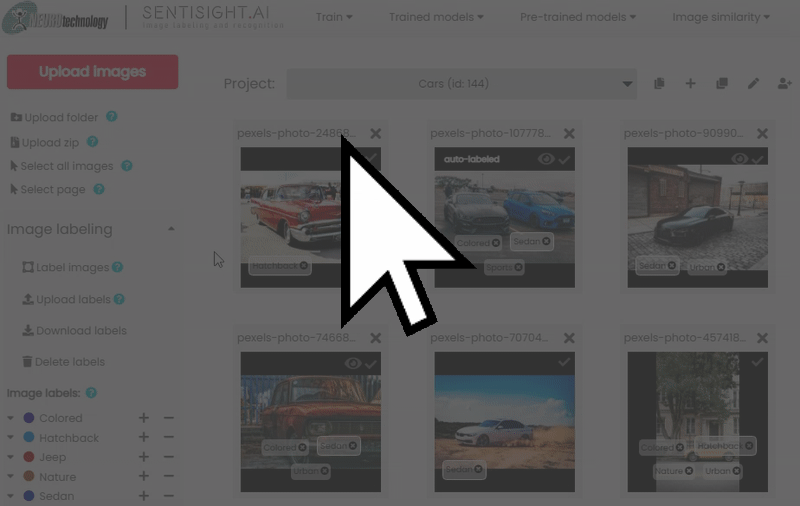
Image filtering
To help you better manage your project, you can filter your images.
In addition to helping you manage your images, filters also limit what images will be considered for model training, opened in the labeling tool, or used in similarity search. If you have any filters on but want to use all the images in your project, don't forget to clear filters.
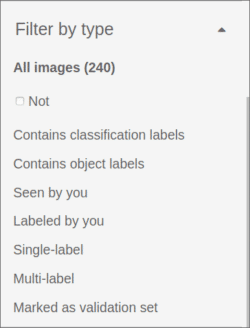
Filter by type allows the user to filter their images by various types. You can check whether or not the images:
- Contain classification labels
- Contain object labels
- Have been seen by you
- Have been labeled by you
- Have a single label
- Have multiple labels
- Are marked as part of the validation set
For example, by choosing Labeled by you and Not you can filter the images that have not been labeled yet and continue where you left off.
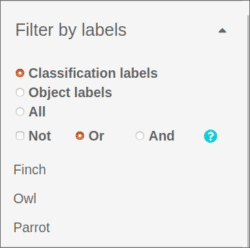
Filter by labels allows the user to filter their images based on the classification and/or object labels they have. You can use Not to filter images that do not have your selected labels and choose between Or and And logic when filtering the images. This is useful when reviewing images labeled by a particular label.
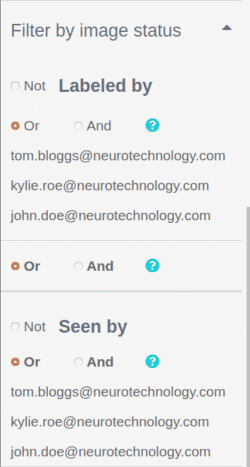
If you shared your project, you will be able to filter the project's images by image status. The new menu will appear in the panel on the left and allow you to check which images have or have not been seen or labeled by certain users. This is very useful for tracking someone's progress or reviewing their labeled images. For example, if Tom is reviewing images labeled by Kylie, he can use filters:
"Labeled by" + "" + And + Not + Seen by + "".
Image operations via REST API
You can also manage your project's images via REST API. Please see here for more information and code samples.
Video tutorials
Below you can find a number of video tutorials that are relevant to this topic.
Managing labeling projects tutorial
Topics covered:
- Sharing projects
- Managing roles and permissions
- Tracking image labeling time
- Filtering images
- Reviewing labeled images
- Labeling settings

Selecting images for training
Topics covered:
- The default platform's behavior - training on all images
- Filtering images by label or by type
- Selecting images for training manually