How it works

Segmentation refers to the advanced form of image recognition, where the algorithm detect objects at pixel-level detail.
The process is fairly straightforward:
- First, you need to upload some images.
- Then you need to label them by masking the parts of image containing objects you want the neural network to recognize with a bitmap or a polygon.
- Then, you train your model — SentiSight.ai does this for you.
- And finally, you can use the trained model to predict where in a given image the object can be found
Let's have a closer look at those steps and how you can perform them easily using SentiSight.ai
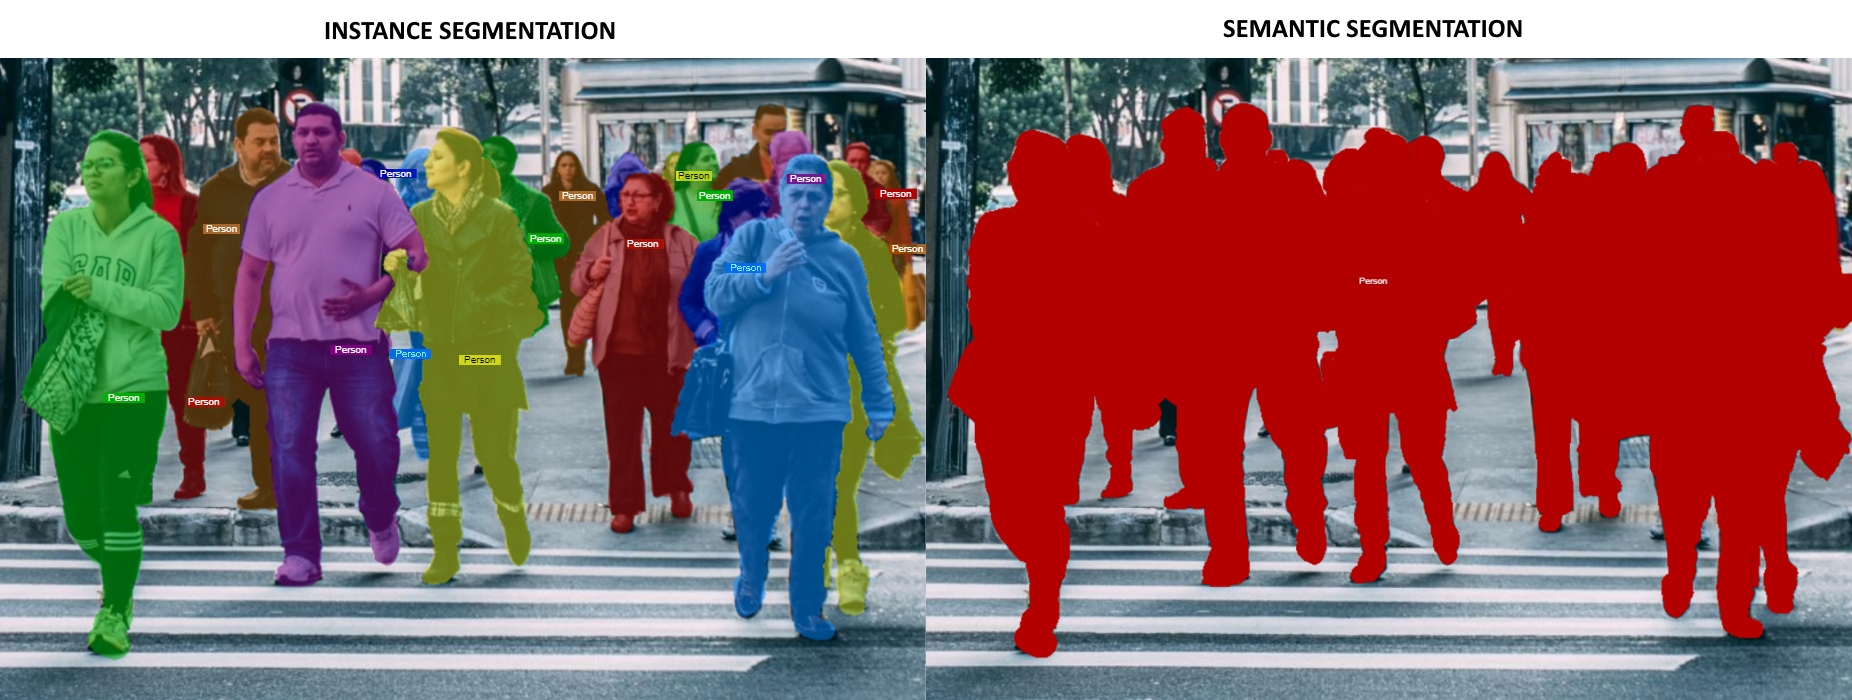
There are two types of image segmentation - semantic segmentation, which detects areas of the image that contain objects of a certain label, and instance segmentation, which detects individual objects of a certain label.
Instance segmentation is more advanced and is more useful in the majority of cases, where detection of individual objects is required. Semantic segmentation is useful in cases where patterns and abstract objects need to be detected.
The SentiSight.ai platform currently allows you to train only Instance Segmentation models, and as such, this user guide will describe only that segmentation type.
Semantic segmentation is currently available as a custom project. Please contact us here if you are interested in a semantic segmentation project.
Uploading and labeling images for segmentation
To train a segmentation model, you need a dataset of uploaded and labeled images.
Click on the red Upload button to upload individual images, or either on Upload folder or Upload zip buttons to upload large numbers of images. You can also upload your images using our API which you can read more about here.
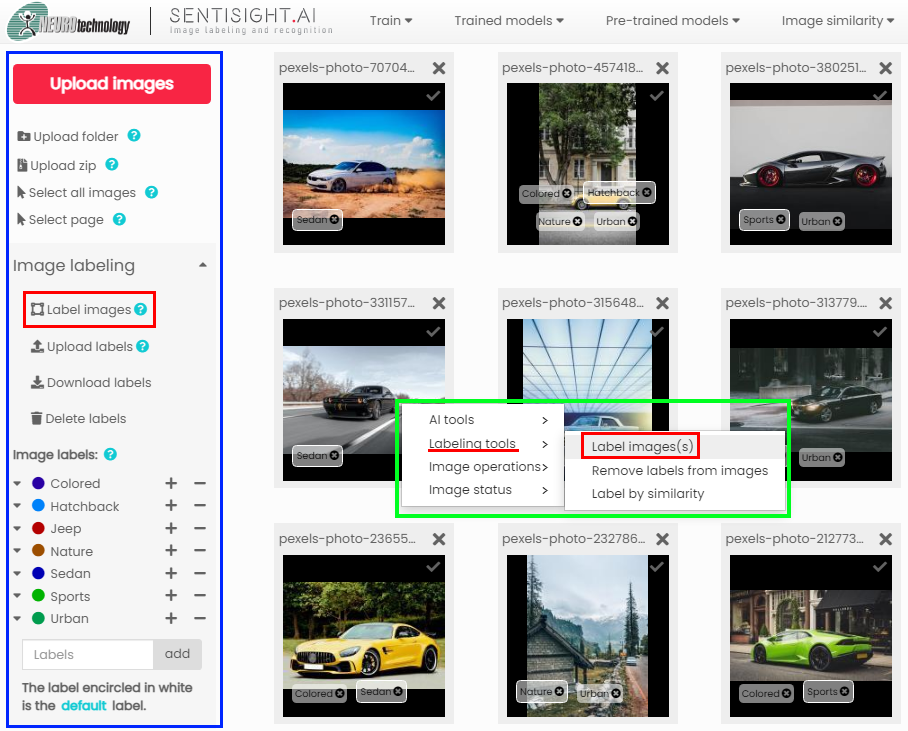
Segmentation training requires images containing polygon and/or bitmap label objects, which can be created with SentiSight.ai labeling tool. To access the labeling tool, select images you want to label and either click on Label images on the dashboard on the left, or right-click the images and click on Labeling. For detailed instructions and tips on creating bitmap and polygon labels manually please have a look here. Alternatively, you can read about uploading already existing labels to SentiSight.ai here.
For the training to be more accurate, you should cover the parts of the image containing the objects as thoroughly as possible.
Training your segmentation model
When you have your images labeled and ready, you can train your segmentation model.
To do so, click on Train model in the top panel and select Instance segmentation.
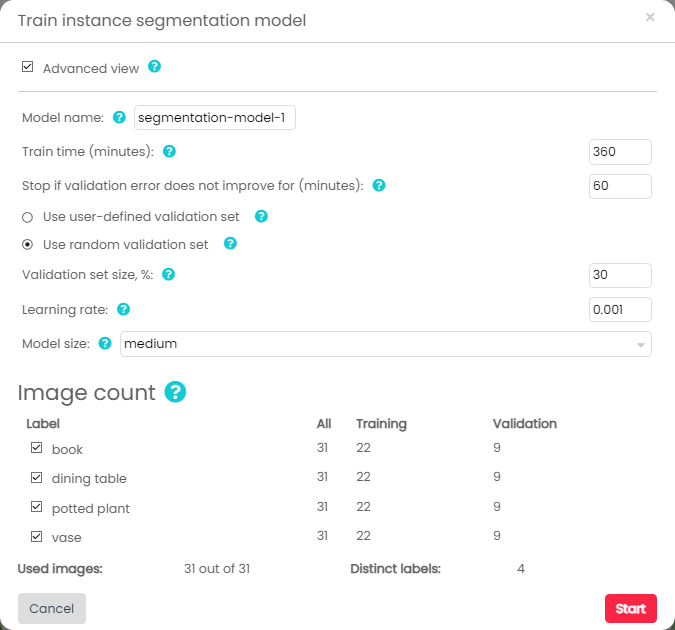
This will bring up the model training interface, where you can set the model name, training time, and the stop time which determines for how long the model is going to continue training if there is no improvement. The improvement is measured by mean Average Precision (mAP), a common metric in instance segmentation.
Please note that the default training time increases with the size of training set, as training a segmentation model takes a long time.
If you turn on advanced view, you can select more additional parameters. These include:
- Use user-defined validation set — whether model should use images marked for validation instead of automated percentage split. You can mark images for validation, by selecting some images, and selecting "add to validation set" on the right-click menu screen.
- Change the validation set size percentage — split between training and validation images
- Learning rate — dictates the rate at which the model weights are updated during the training.
Also you can select what size of model you want to train—small, medium, or large. Larger models have higher prediction accuracy, while the inference is quicker for the smaller models. As such, model size is a choice between recognition speed and prediction accuracy.
The training process
Once you are happy with the training parameters, set your model to start training by clicking Start. You can track the progress of the model training at the top of your screen.
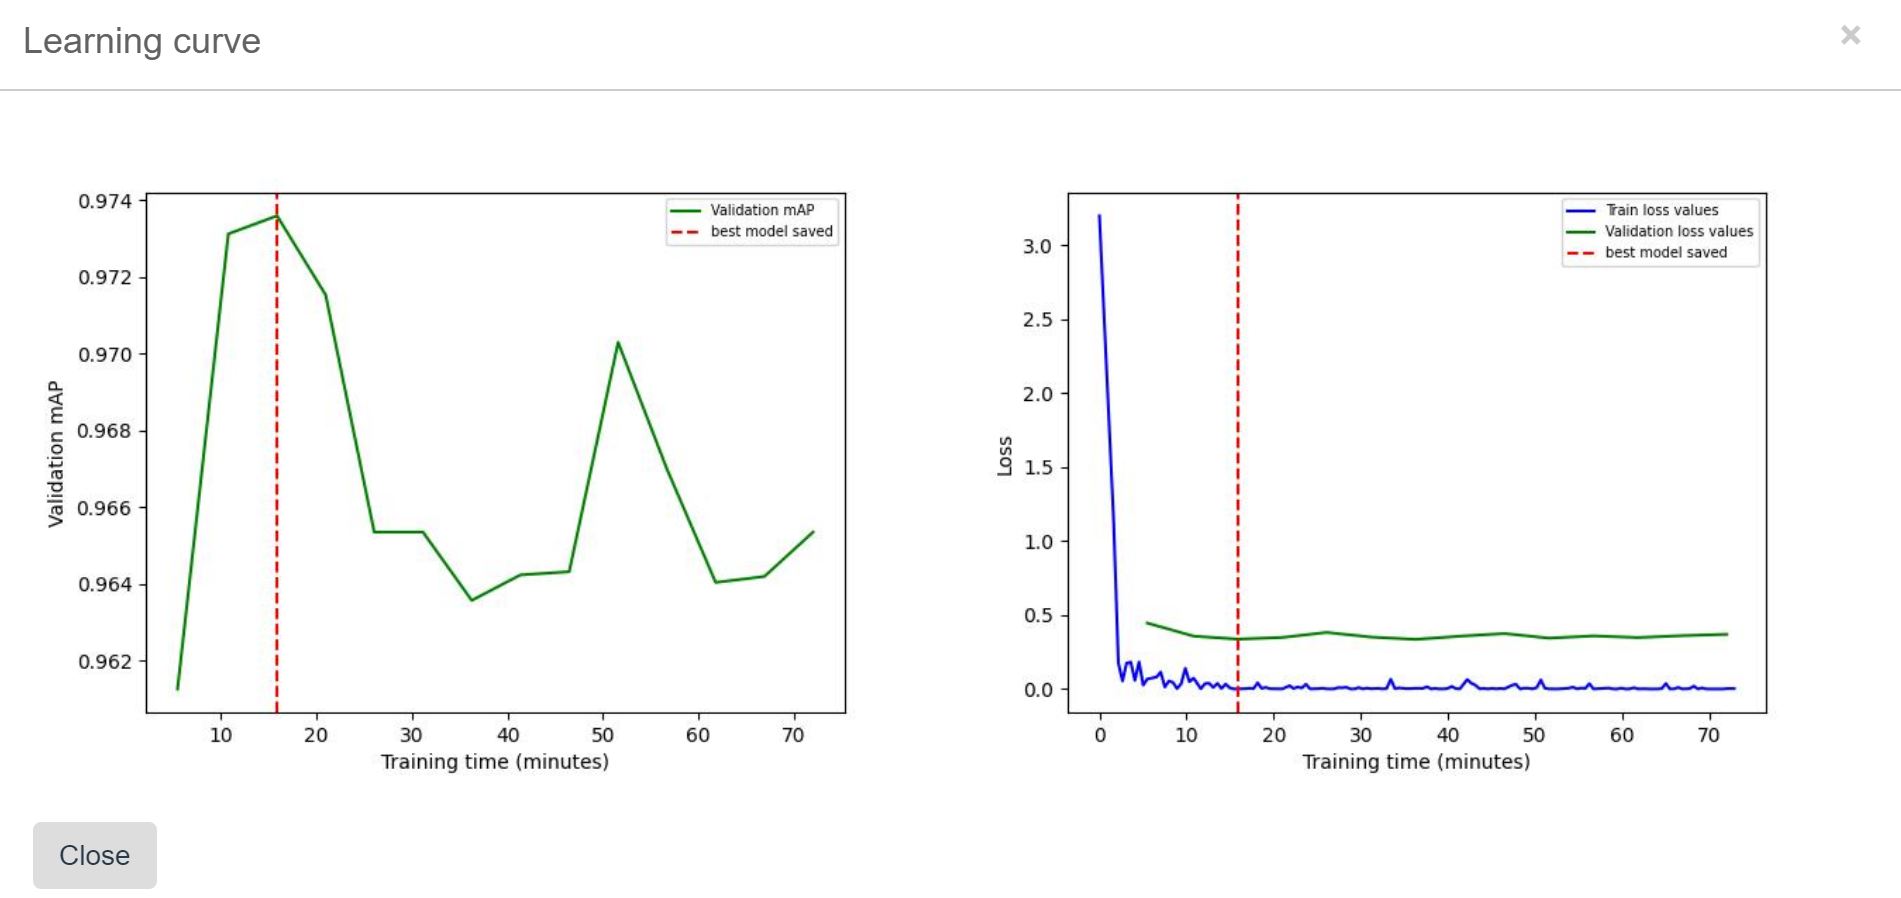
In image segmentation model training you can check the learning curves at any time, to see how the training is going.
After the model is trained, you can find the final learning curves in model info window.
The validation curves which show a learning curve for accuracy, and a learning curve for cross entropy loss. The red line on the learning curves show when the best model was saved. The best model is selected based on the highest mAP value on the validation set. In some cases, (for example, when your validation set is small and lacks diversity) you might not want to trust this estimate, so you could choose to use the "last" model instead of the "best" model.
After approximately 10 minutes of model training have elapsed, you can stop the training process. This will not delete the model—it will be saved and usable. You might do this if you noticed that accuracy is dropping in the learning curve, or because you need the model available as soon as possible.
Analyzing the model’s performance
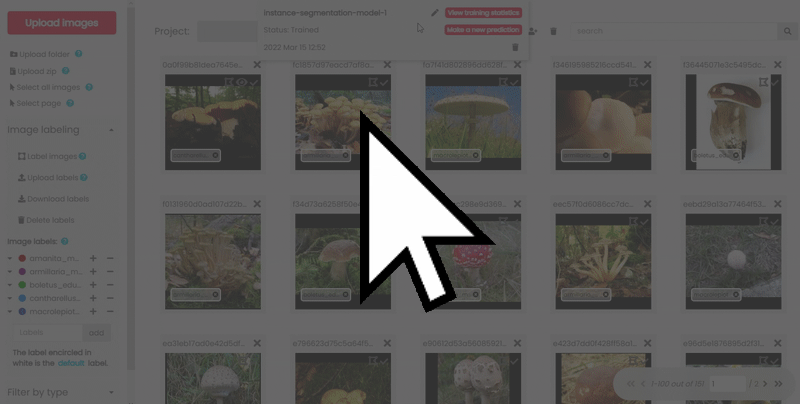
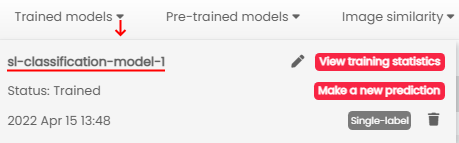
After the model has been trained, you can view the model’s performance by clicking on View training statistics from the Trained models menu.
The statistics window is divided into two tabs: Training and Validation. Training tab contains the statistics on the images that were used for the training, while the Validation tab contains the statistics for the images which where not used for the model training. Each tab contains the label count and global statistics, such as Accuracy, Precision, Recall, F1 and mAP. You can find the definition of each statistic by clicking a question mark next to it.
You can also click Show predictions to see the actual predictions for specific images, for either the train or validation set.
A prediction is judged to be correct if the predicted bitmap sufficiently overlaps with the ground truth bitmap. The amount these two bitmaps overlap is measured by a so called "Intersection over Union (IoU)" measure. By default for the prediction to be considered correct, the IoU should be more than 50%, but you can change this threshold. You can also filter the results to show only the correct or incorrect predictions.
Understanding best model
Model training process consists of continuously updating model parameters (also called model "weights"). A model with a specific set of parameters is called a model "checkpoint". Terms best model and last model refer to different model checkpoints which were saved during the training process. Best model is selected based on best mAP value on the validation set.
Users are able to choose whether to use the best model or to use the last model. We usually recommend using the best model but if your validation dataset is small and lacks diversity, you might consider using the last model instead.
You can find information when the best model and last model were saved at the top of the training statistics (last model save time is the same as train time).
If you would like to download the predictions, you can do so by clicking on Download Predictions, which will download a .zip file that includes the resized images, ground truth labels, and the predictions in shape of bitmaps.
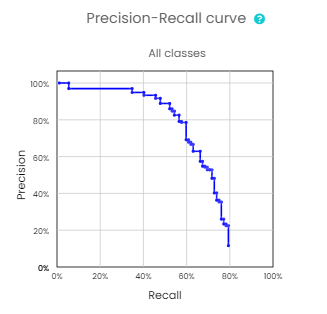
In the advanced view, you can see the precision-recall curve for your model. By default, this curve is showing statistics for all classes, however you can change this to show the precision-recall curve for specific labels.
The precision is the percentage of predictions out of all of the predictions that were made. The recall is the percentage of correctly predicted instances of some class out of all instances of that class in the data set. F1 is the harmonic mean of the precision and the recall. The precision, recall and F1 values depend on the selected score threshold.
The score threshold determines when the prediction is considered positive and a bitmap mask is drawn. For example, if the score threshold is 50%, all bitmaps whose score is above 50% are drawn. When you increase the score threshold, fewer masks will be drawn, but they will be more likely correct, thus increasing the precision. On the contrary when you decrease the score threshold, more bitmap masks will be drawn, each of which will be less likely to be correct, but they will cover a larger amount of ground truth bitmaps, thus increasing the recall. The score threshold can be set for every class separately, but it is also possible to use the same score threshold for all classes.
By default, we select the score thresholds that optimize the F1 score, which is a good compromise. However, if you prioritize either precision or recall, you can adjust the score thresholds for each class manually.
The intersection between the precision-recall curve and the dashed red line represents the response to the optimized score threshold. If you would like to change this threshold, uncheck the ‘Use optimized thresholds’ feature, and then you can enter your own threshold score in the box, or you can change the score threshold by clicking anywhere on the precision-recall curve. Once you have set the new threshold, the performance statistics will update. When setting your own score threshold, you want to choose as high a precision and recall as possible, so if you can increase one without compromising the other, you should always do that.
Please, not that the score thresholds change simultaneously both for train and validation sets. The new score thresholds are also represented by changed vertical dashes in the “View predictions” window.
If you want to set a uniform threshold for all classes, this can be achieved using "Set all” button.
Making predictions
Making predictions using web-interface
The easiest way to use instance segmentation model is through SentiSight.ai web-interface.
Predictions on Uploaded images
There are two ways to launch a prediction with an uploaded image.
- You can click Make a new prediction button in the Trained Models dropdown.
- You can click Make a new prediction button in the Model statistics window.
This will open predictions window and you will have to click Upload images to choose which images to perform prediction on.
You can always click Upload images to start a new prediction.
You can download the results either as images with separate matching bitmap masks, or, in JSON format.
Predictions on existing images
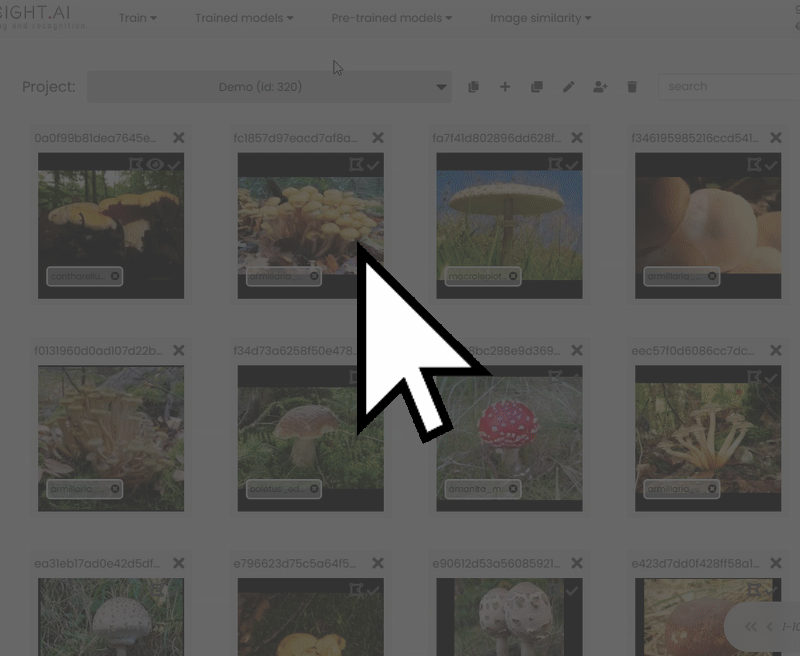
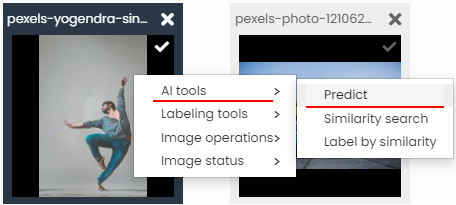
Alternatively, you can launch predictions on existing project images.
Right-click an image in the project, click Predict and then choose desired model.
This will open predictions window and immediately launch prediction with selected model.
Making predictions via REST API
Alternatively, you can make predictions by using your preferred scripting language via REST API, allowing you to automate the process and make predictions from an app/software that you are developing.
To begin using your trained model via REST API you will need these details:
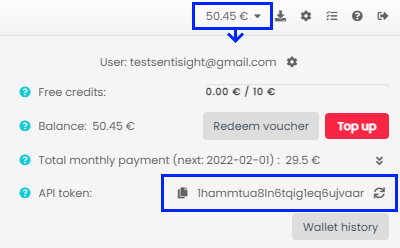
- API token (available under "Wallet" menu tab)
- Project ID (available in brackets next to project names)

- Model name (shown in many places, for example, under "Trained models" menu)
Use this endpoint: https://platform.sentisight.ai/api/predict/{your_project_id}/{your_model_name}/
Please note that for each trained model we save two checkpoints: "the best"—the one with the highest validation mean Average Precision (mAP) and "the last"—the one from the last training iteration. By default we will use "the best" model checkpoint to make the predictions for queries via REST API interface. However, if you prefer to use "the last" model checkpoint to make your predictions, you can simply add "/last" to the endpoint: https://platform.sentisight.ai/api/predict/{your_project_id}/{your_model_name}/last
Making predictions using an image from your computer
Set the "X-Auth-token" header to your API token string and set "Content-Type" header to "application/octet-stream". Set the body to your image file.
For more details, see the code samples below.
TOKEN="your_token"
PROJECT_ID="your_project_id"
MODEL="your_model_name"
IMAGE_FILENAME="your_image_path"
curl -H "X-Auth-token: $TOKEN" --data-binary @"$IMAGE_FILENAME"
  -H "Content-Type: application/octet-stream"
  -X POST "https://platform.sentisight.ai/api/predict/$PROJECT_ID/$MODEL"
import java.io.BufferedReader;
import java.io.DataOutputStream;
import java.io.File;
import java.io.IOException;
import java.io.InputStreamReader;
import java.net.HttpURLConnection;
import java.net.URL;
import java.nio.file.Files;

public class App
{
   public static void main( String[] args ) throws IOException
   {
       if (args.length < 4) {
           System.out.println("Usage: java -jar sample.jar api_token project_id model_name file");
       }
       String token = args[0];
       String projectId = args[1];
       String modelName = args[2];
       String imageFilename = args[3];

       byte[] bytes = Files.readAllBytes(new File(imageFilename).toPath());

       URL url = new URL("https://platform.sentisight.ai/api/predict/" + projectId + "/" + modelName);
       HttpURLConnection connection = (HttpURLConnection)url.openConnection();
       connection.setRequestProperty("Content-Type", "application/octet-stream");
       connection.setRequestProperty("X-Auth-token", token);
       connection.setRequestMethod("POST");
       connection.setDoOutput(true);
       DataOutputStream wr = new DataOutputStream(connection.getOutputStream());
        wr.write(bytes);
        wr.flush();
        wr.close();

        BufferedReader in = new BufferedReader(new InputStreamReader(connection.getInputStream()));
        String output;
        StringBuffer response = new StringBuffer();

        while ((output = in.readLine()) != null) {
            System.out.println(output);
            response.append(output);
        }
        in.close();
   }
}
<!DOCTYPE html>
<html lang="en" dir="ltr">
<head>
    <meta charset="utf-8">
    <title>Sample</title>
    <script type="text/javascript">
        const baseApiURL = 'https://platform.sentisight.ai/api/';
        let token = '';
        let predictionId;
        let results;
        let resultOutput;

        function predict() {
            token = document.getElementById('tokenfield').value;
            const projectId = document.getElementById('project').value;
            const modelName = document.getElementById('model').value;
            const input = document.getElementById('upload');
            const resultOutput = document.getElementById('output');
            const file = input.files[0];
            const fr = new FileReader();
            fr.onload = function() {
                results = apiPostRequest('predict/' + projectId + '/' + modelName, fr.result);
                let parsedResults = JSON.parse(results);
                resultOutput.innerText = results
                console.log(parsedResults);
            }
            fr.readAsArrayBuffer(file);
        }

        function apiPostRequest(request, body) {
            const xmlHttp = new XMLHttpRequest();
            xmlHttp.open( "POST",  baseApiURL + request, false );
            xmlHttp.setRequestHeader('Content-Type', 'application/octet-stream');
            xmlHttp.setRequestHeader('X-Auth-token', token);
            xmlHttp.send(body);
            console.log(xmlHttp.responseText);
            return xmlHttp.responseText;
        }
    </script>
</head>
<body>
Token: <input id="tokenfield" type="text" name="" value="">
<br>
Project id: <input id="project" type="number" name="" value="">
<br>
Model name: <input id="model" type="text" name="" value="">
<br>
Upload image: <input id="upload" type="file" name="" value="">
<br>
<button type="button" onclick="predict()">Predict</button>
<br><br><br>
<p id="output">Your results will go here!</p>
</body>
</html>
import requests
token = "your_token"
project_id = "your_project_id"
model = "your_model_name"
image_filename = "your_image_path"
headers = {"X-Auth-token": token, "Content-Type": "application/octet-stream"}
with open(image_filename, 'rb') as handle:
r = requests.post('https://platform.sentisight.ai/api/predict/{}/{}/'.format(project_id,model), headers=headers, data=handle)
if r.status_code == 200:
print(r.text)
else:
print('Error occured with REST API.')
print('Status code: {}'.format(r.status_code))
print('Error message: ' + r.text)
using System;
using System.IO;
using System.Net.Http;
using System.Net.Http.Headers;

namespace Sample
{
    class Program
    {
        static void Main(string[] args)
        {
            if (args.Length < 4)
            {
                Console.WriteLine("Expected arguments: api_token project_id model_name file");
                return;
            }
            var token = args[0];
            var projectId = args[1];
            var modelName = args[2];
            var imageFilename = args[3];

            var bytes = File.ReadAllBytes(imageFilename);
            var data = new ByteArrayContent(bytes);
            data.Headers.ContentType = MediaTypeHeaderValue.Parse("application/octet-stream");

            var uri = new Uri($"https://platform.sentisight.ai/api/predict/{projectId}/{modelName}");
            var client = new HttpClient();
            client.DefaultRequestHeaders.Add("X-Auth-token", token);

            var response = client.PostAsync(uri, data);
            var result = response.Result.Content.ReadAsStringAsync().Result;
            Console.WriteLine(result);
        }
    }
}
Making predictions using an image URL
Using the REST API by providing an image URL is similar to the previous case of using REST API by uploading an image. The only differences are that you need to set the "Content-Type" header to "application/json" and set the body to a JSON formatted string with a "url" parameter specifying the image URL.
For more details, see the code samples below.
TOKEN="your_token"
PROJECT_ID="your_project_id"
MODEL="your_model_name"
IMAGE_URL="your_image_url"
curl --location --request POST "https://platform.sentisight.ai/api/predict/$PROJECT_ID/$MODEL"
--header 'X-Auth-token: $TOKEN'
--header 'Content-Type: application/json'
--data-raw '{
    "url": ""$IMAGE_URL""
}'
package sentisight.api.sample;

import java.io.BufferedReader;
import java.io.DataOutputStream;
import java.io.IOException;
import java.io.InputStreamReader;
import java.net.HttpURLConnection;
import java.net.URL;

public class App
{
    public static void main( String[] args ) throws IOException
    {
        String token = "";
        String projectId = "";
        String modelName = "";
        String image_url = "";

        String body = "{rn    "url": "%s"rn}".formatted(image_url);

        URL url = new URL("https://platform.sentisight.ai/api/predict/" + projectId + "/" + modelName);
        HttpURLConnection connection = (HttpURLConnection)url.openConnection();
        connection.setRequestProperty("Content-Type", "application/json");
        connection.setRequestProperty("X-Auth-token", token);
        connection.setRequestMethod("POST");
        connection.setDoOutput(true);
        DataOutputStream wr = new DataOutputStream(connection.getOutputStream());
        wr.writeBytes(body);
        wr.flush();
        wr.close();

        BufferedReader in = new BufferedReader(new InputStreamReader(connection.getInputStream()));
        String output;
        StringBuilder response = new StringBuilder();

        while ((output = in.readLine()) != null) {
            response.append(output);
        }
        System.out.println(response);
        System.out.println(connection.getResponseCode());
        in.close();
    }
}
<!DOCTYPE html>
<html lang="en" dir="ltr">
<head>
    <meta charset="utf-8">
    <title>Sample</title>
    <script type="text/javascript">
        const baseApiURL = 'https://platform.sentisight.ai/api/';
        let token = '';
        let results;
        let resultOutput;

        function predict() {
            token = document.getElementById('tokenfield').value;
            const projectId = document.getElementById('project').value;
            const modelName = document.getElementById('model').value;
            resultOutput = document.getElementById('output');
            const url = document.getElementById('url').value;
            const data = JSON.stringify({
                url
            });
            results = apiPostRequest('predict/' + projectId + '/' + modelName, data)
            let parsedResults = JSON.parse(results);
            resultOutput.innerText = results
            console.log(parsedResults);
        }

        function apiPostRequest(request, body) {
            const xmlHttp = new XMLHttpRequest();
            xmlHttp.open( "POST",  baseApiURL + request, false );
            xmlHttp.setRequestHeader('Content-Type', 'application/json');
            xmlHttp.setRequestHeader('X-Auth-token', token);
            xmlHttp.send(body);
            console.log(xmlHttp.responseText);
            return xmlHttp.responseText;
        }
    </script>
</head>
<body>
Token: <input id="tokenfield" type="text" name="" value="">
<br>
Project id: <input id="project" type="number" name="" value="">
<br>
Model name: <input id="model" type="text" name="" value="">
<br>
Url: <input id="url" type="text" name="" value="">
<br>
<button type="button" onclick="predict()">Predict</button>
<br><br><br>
<p id="output">Your results will go here!</p>
</body>
</html>
import requests
import json
token = "your_token"
project_id = "your_project_id"
model = "your_model_name"
image_url = "http://your-image-url.png"
payload = json.dumps({
"url": image_url
})
headers = {"X-Auth-token": token, "Content-Type": "application/json"}
r = requests.post('https://platform.sentisight.ai/api/predict/{}/{}/'.format(project_id, model), headers=headers,
data=payload)
if r.status_code == 200:
print(r.text)
else:
print('Error occured with REST API.')
print('Status code: {}'.format(r.status_code))
print('Error message: ' + r.text)
using System;
using System.IO;
using System.Net.Http;
using System.Text;
using System.Text.Json;

namespace Sample
{
    class Program
    {
        static void Main(string[] args)
        {
            if (args.Length < 4)
            {
                Console.WriteLine("Expected arguments: api_token project_id model_name url");
                return;
            }
            var token = args[0];
            var projectId = args[1];
            var modelName = args[2];
            var imageUrl = args[3];

            using var ms = new MemoryStream();
            using var writer = new Utf8JsonWriter(ms);
            writer.WriteStartObject();
            writer.WriteString("url", imageUrl);
            writer.WriteEndObject();
            writer.Flush();
            var json = Encoding.UTF8.GetString(ms.ToArray());

            var data = new StringContent(json, Encoding.Default, "application/json");

            var uri = new Uri($"https://platform.sentisight.ai/api/predict/{projectId}/{modelName}");
            var client = new HttpClient();
            client.DefaultRequestHeaders.Add("X-Auth-token", token);

            var response = client.PostAsync(uri, data);
            var result = response.Result.Content.ReadAsStringAsync().Result;
            Console.WriteLine(result);
        }
    }
}
Making predictions using a Base64 encoded image
Using the REST API by providing a Base64 encoded image is very similar to the case of using REST API with an image URL. The only difference is that you need to change the JSON parameter name "url" to "base64".
For more details, see the code samples below.
TOKEN="your_token"
PROJECT_ID="your_project_id"
MODEL="your_model_name"
IMAGE_B64=""
curl --location --request POST "https://platform.sentisight.ai/api/predict/$PROJECT_ID/$MODEL"
--header 'X-Auth-token: $TOKEN'
--header 'Content-Type: application/json'
--data-raw '{
    "base64": ""$IMAGE_B64""
}'
package sentisight.api.sample;

import java.io.BufferedReader;
import java.io.DataOutputStream;
import java.io.IOException;
import java.io.InputStreamReader;
import java.net.HttpURLConnection;
import java.net.URL;

public class App
{
    public static void main( String[] args ) throws IOException
    {
        String token = "";
        String projectId = "";
        String modelName = "";
        String image_b64 = "";

        String body = "{rn    "base64": "%s"rn}".formatted(image_b64);

        URL url = new URL("https://platform.sentisight.ai/api/predict/" + projectId + "/" + modelName);
        HttpURLConnection connection = (HttpURLConnection)url.openConnection();
        connection.setRequestProperty("Content-Type", "application/json");
        connection.setRequestProperty("X-Auth-token", token);
        connection.setRequestMethod("POST");
        connection.setDoOutput(true);
        DataOutputStream wr = new DataOutputStream(connection.getOutputStream());
        wr.writeBytes(body);
        wr.flush();
        wr.close();

        BufferedReader in = new BufferedReader(new InputStreamReader(connection.getInputStream()));
        String output;
        StringBuilder response = new StringBuilder();

        while ((output = in.readLine()) != null) {
            response.append(output);
        }
        System.out.println(response);
        System.out.println(connection.getResponseCode());
        in.close();
    }
}
<!DOCTYPE html>
<html lang="en" dir="ltr">
<head>
  <meta charset="utf-8">
  <title>Sample</title>
  <script type="text/javascript">
    const baseApiURL = 'https://platform.sentisight.ai/api/';
    let token = '';
    let results;
    let resultOutput;

    function predict() {
      token = document.getElementById('tokenfield').value;
      const projectId = document.getElementById('project').value;
      const modelName = document.getElementById('model').value;
      resultOutput = document.getElementById('output');
      const base64 = document.getElementById('base64').value;
      const data = JSON.stringify({
        base64
      });
      results = apiPostRequest('predict/' + projectId + '/' + modelName, data)
      let parsedResults = JSON.parse(results);
      resultOutput.innerText = results
      console.log(parsedResults);
    }

    function apiPostRequest(request, body) {
      const xmlHttp = new XMLHttpRequest();
      xmlHttp.open( "POST",  baseApiURL + request, false );
      xmlHttp.setRequestHeader('Content-Type', 'application/json');
      xmlHttp.setRequestHeader('X-Auth-token', token);
      xmlHttp.send(body);
      console.log(xmlHttp.responseText);
      return xmlHttp.responseText;
    }
  </script>
</head>
<body>
Token: <input id="tokenfield" type="text" name="" value="">
<br>
Project id: <input id="project" type="number" name="" value="">
<br>
Model name: <input id="model" type="text" name="" value="">
<br>
Base64: <input id="base64" type="text" name="" value="">
<br>
<button type="button" onclick="predict()">Predict</button>
<br><br><br>
<p id="output">Your results will go here!</p>
</body>
</html>
import requests
import json
token = "your_token"
project_id = "your_project_id"
model = "your_model_name"
image_b64 = ""
payload = json.dumps({
"base64": image_b64
})
headers = {"X-Auth-token": token, "Content-Type": "application/json"}
r = requests.post('https://platform.sentisight.ai/api/predict/{}/{}/'.format(project_id, model), headers=headers,
data=payload)
if r.status_code == 200:
print(r.text)
else:
print('Error occured with REST API.')
print('Status code: {}'.format(r.status_code))
print('Error message: ' + r.text)
using System;
using System.IO;
using System.Net.Http;
using System.Text;
using System.Text.Json;

namespace Sample
{
    class Program
    {
        static void Main(string[] args)
        {
            if (args.Length < 4)
            {
                Console.WriteLine("Expected arguments: api_token project_id model_name base64");
                return;
            }
            var token = args[0];
            var projectId = args[1];
            var modelName = args[2];
            var imageB64 = args[3];

            using var ms = new MemoryStream();
            using var writer = new Utf8JsonWriter(ms);
            writer.WriteStartObject();
            writer.WriteString("base64", imageB64);
            writer.WriteEndObject();
            writer.Flush();
            var json = Encoding.UTF8.GetString(ms.ToArray());

            var data = new StringContent(json, Encoding.Default, "application/json");

            var uri = new Uri($"https://platform.sentisight.ai/api/predict/{projectId}/{modelName}");
            var client = new HttpClient();
            client.DefaultRequestHeaders.Add("X-Auth-token", token);

            var response = client.PostAsync(uri, data);
            var result = response.Result.Content.ReadAsStringAsync().Result;
            Console.WriteLine(result);
        }
    }
}
SentiSight.ai OpenAPI specification
List of endpoints: https://app.swaggerhub.com/apis-docs/SentiSight.ai/sentisight.
API code samples: https://app.swaggerhub.com/apis/SentiSight.ai/sentisight.
You can try out our REST API interactively and convert Swagger specification to code samples in many different languages.
Using the model offline—setting up your own REST API server
For a variety of reasons you might want to use a trained model independently from SentiSight.ai platform, or indeed without internet connection at all. You can do that by setting up your own REST API server with a model you trained on SentiSight.ai.
In order to set up your own REST API server, you will have to download an offline version of the model. To do that, click on the Download model button in the "View training statistics" page.
After the model is downloaded, follow the instructions in Readme.md to set up your local REST API server. You can make the client requests from the same PC on which you set up the server, so the model would be run completely offline. On the other hand, after you set up REST API server, you can also make client requests to this server from many different devices (including mobile) on your network. Note that the REST API server must be run on a Linux system, but the client devices can run on any operating system.
The offline version of the model can be run as a free trial for 30 days. After this period, if you like the offline version, you will have to buy a license from us. Note that we have three options for the speed of the offline model: "slow", "medium" and "fast". The license price depends on the selected speed. The free trial always runs on the "fast" speed mode.