
Build your own object detection models to identify and locate objects within images
SentiSight.ai is the place to build your own object detection models.
Object detection models are used to identify and locate objects within images. There is a wide variety of use cases for object detection models, across a range of different industries and sectors, such as Medicine, Retail and Agriculture.
SentiSight.ai’s intuitive and user-friendly interface allows everyone, whether you are a novice or an expert, to train your own model for object detection.
If you have the idea of how apply and use object detection models, SentiSight.ai is the place to build it.
Object Detection Models in Three Easy Steps
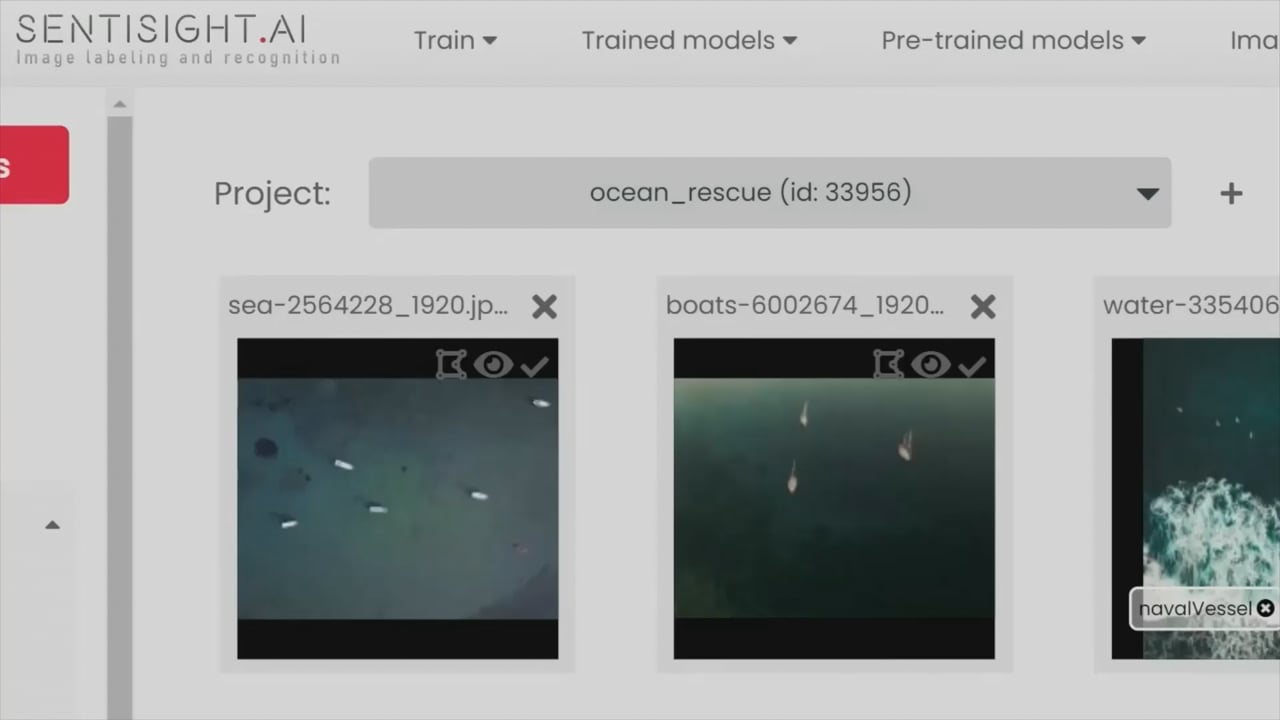
Upload and Label your Images
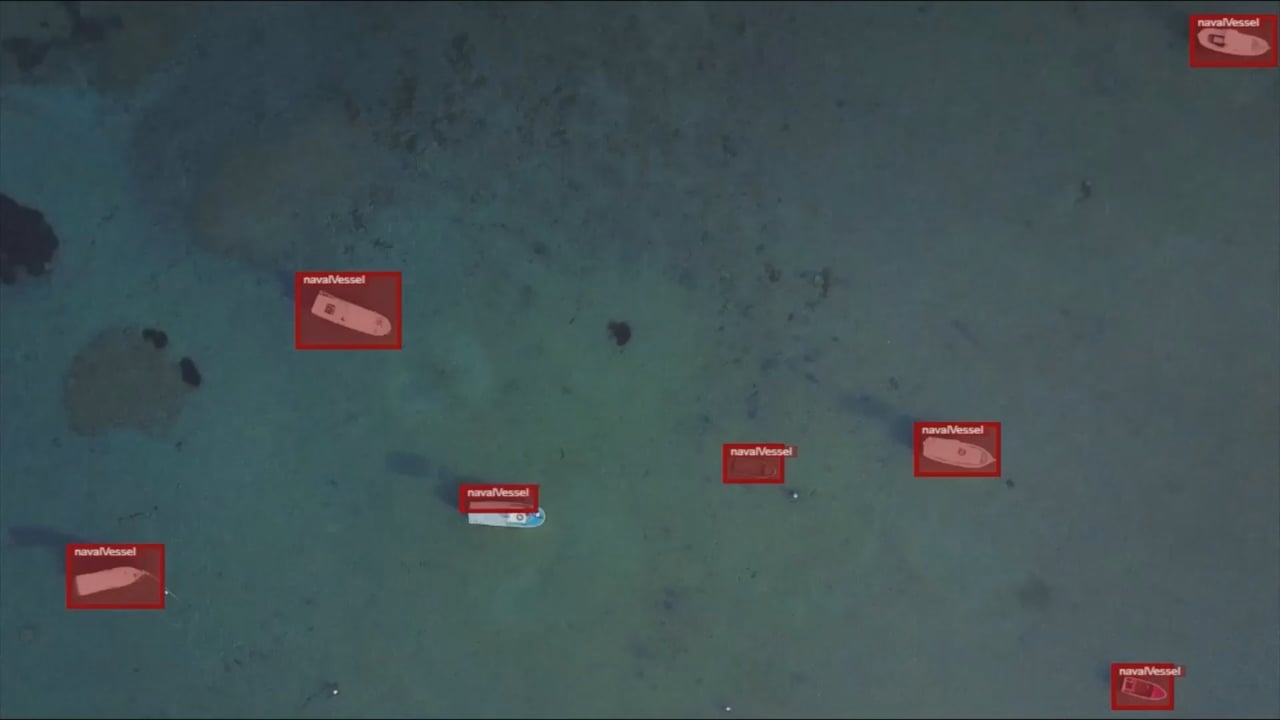
First you need to create your data set, by uploading your images and marking your objects of interest with a "bounding box", a rectangular frame that shows the location of the object(s) in an image.
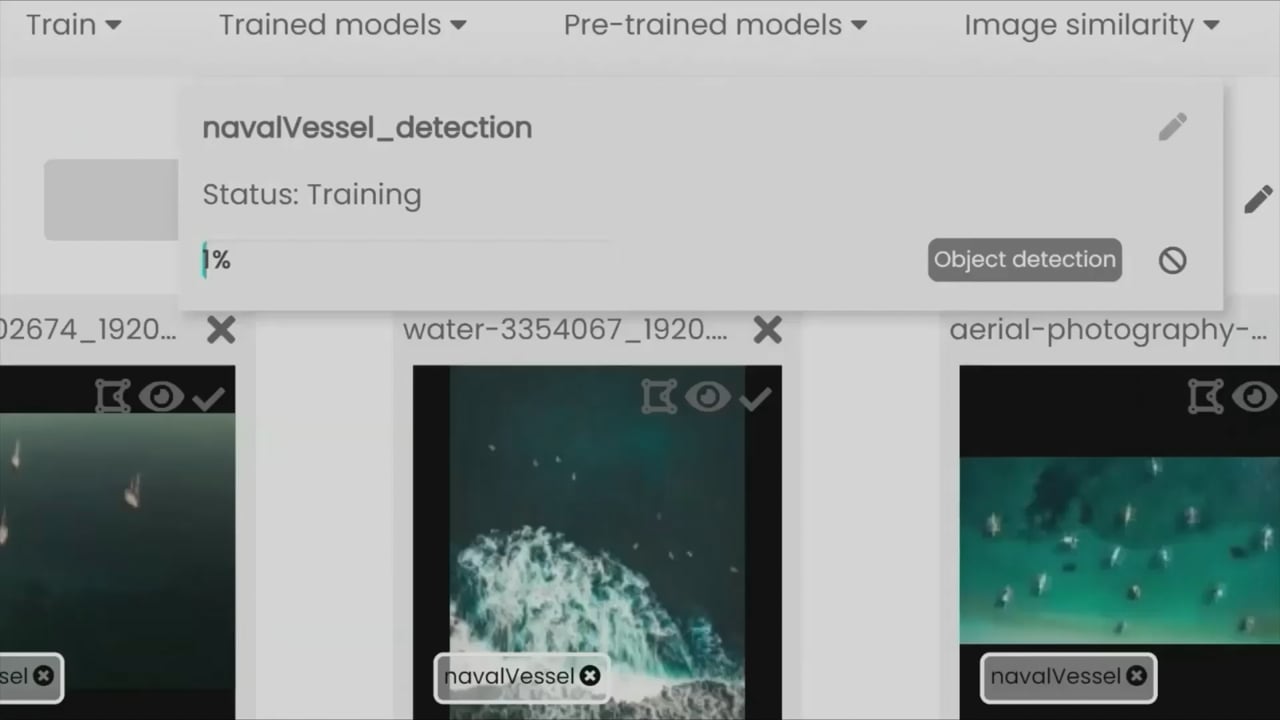
Train Your Model
All you need to do to train your model is to click a single button and the model starts training!
More experienced users can choose to set a range of advanced parameters to tailor your model to your exact requirements.
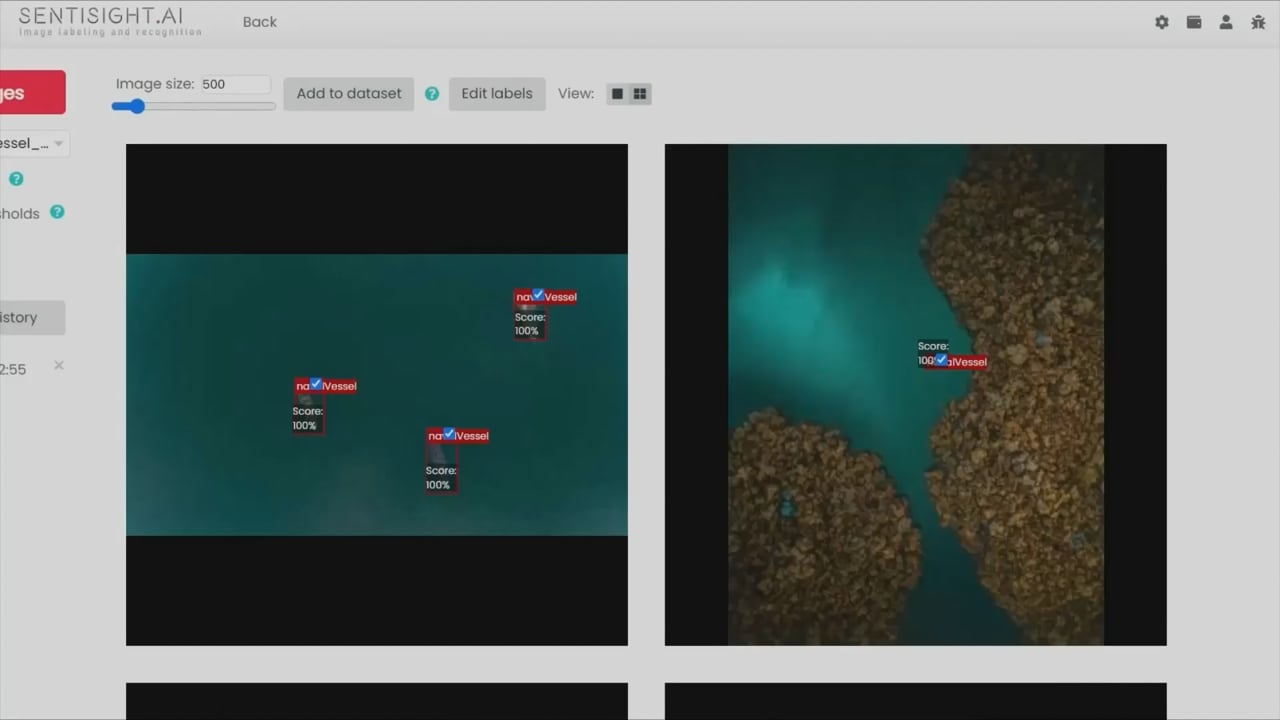
Make Predictions
Once the model is trained, you can make predictions with it either via web-based interface, via REST API (cloud solution) or download the trained model locally (on-premise solution).
The SentiSight.ai platform is simple for beginners, yet powerful for experts
SentiSight.ai also offers advanced features, that allow you to set a range of different parameters for training your object detection models, as well as being able to view detailed statistics of the trained models. All of it is optional for beginners, but can come in handy for our advanced users!
These advanced features include:
- View learning curves
- View precision-recall curves
- Set score thresholds for each class individually or use optimized ones
- Choose the model size
- Fully customize the validation set
- View and filter predictions on the training and validation sets
- Use unlabeled images as negative samples
Use Cases and Industry Applications of Object Detection Models
Object Detection has an assortment of use cases and applications across a range of industries.

Manufacturing

Publishing

Healthcare

Agriculture

Retail

Sales
Features of the SentiSight.ai Object Detection Tool

Easy to Use
Despite the extensive features and capabilities, SentiSight.ai has been designed to be intuitive and user friendly, even for those with little to no training in AI or deep learning. The extensive user guides will help you train your own models step-by-step with ease.

Advanced Training Parameters
SentiSight.ai provides advanced training parameters for every model, to ensure that users have complete control over the creation and training of their own bespoke models.

Detailed Statistics
Our platform provides users with detailed statistics so that you can better understand the performance, capabilities and possible limitations of the models that you create.

Train on Cloud
For ultimate flexibility, users can train their own bespoke models on the cloud, without the need to have expensive GPU capabilities.

Use Via Cloud
Users are able to use the bespoke models via the cloud, bringing accessibility and scalability to every user.

On-Premise Models
For users that have their own powerful hardware, the user-trained models can be downloaded for on-premise deployment and use.
Train your object detection models or use a pre-trained model
Object detection models can either be trained on your own images to identify objects you labeled or pre-trained models can be used to identify a pre-defined set of objects.

Train your own object detection model
Training your very own model sounds daunting, but our user-friendly interface
allows even a novice to train a model unique to your requirements.
Check out our quick-start guide to help get you started!

Use pre-trained object detection model
SentiSight.ai has a pre-trained object detection model that can be used as a turnkey solution. You can use the pre-trained model if the object label you want to recognize is included in this list of labels.
Four different ways to use the Object Detection Tool
You can deploy your object detection models in a number of ways, depending on your requirements and set-up.

Web Interface
Using the SentiSight.ai tools on the Web Interface is the quickest and most straightforward way to train and build your own model for object detection, which is great for trying out your models or using them if you do not require scalability.

REST API
Using the REST API to build your SentiSight.ai object detection models, this offers you a great deal of flexibility and scalability without the need for expensive hardware such as GPUs.
On Premise Models
The SentiSight.ai Object Detection tool is available to download for offline use, allowing you to use the tool without the need to send data to our server.

Mobile app
The SentiSight.ai mobile app enables users to easily make object detection predictions from their phone, as well as uploading images to their projects.


Object Detection Models User Guide

Our platform contains numerous tools, ranging in capability and complexity. For new users to the image recognition field this can be slightly daunting which is why we have simplified the object detection model training process by providing a user guide.
As previously mentioned, training your object detection model to identify the location of the specified object within a given image revolves around a straightforward process:
- Uploading Images
- Labeling Images
- Training the model courtesy of SentiSight.ai
Our comprehensive user guide includes an in-depth breakdown of multiple object detection model features including:
- Upload images: learn to upload the images individually, as a folder, zip buttons or using our API.
- Label images: figure out how to label with one shape for the purpose of object detection, including using shortkeys to speed up the process and adjusting the tools settings to suit the needs of your task.
- Training your object detection model: many parameters can be altered depending on the experience of the user. Also, learn how to delve deep into the analysis of your models performance.
- Making predictions: make new predictions on previously used or new images via the SentiSight.ai web-interface or use your code of choice to run predictions via our REST API.
- Using your object detection model offline: clear instructions on how you can set up your trained model to use offline by setting up your own REST API server on a Linux system.
For more information on all of the above visit our user guide here.
In addition to the user guide, we also provide a detailed video tutorial for our users so they can fully get to grips with training their object detection models via SentiSight.ai.
Video Tutorial
Object detection training tutorial
Topics covered:
- Basics of bounding box labeling
- Selecting parameters
- Training object detection model
- Analyzing learning curve
- Analyzing statistics and predictions
- Analyzing precision-recall curve
- Changing score thresholds
- Downloading model or using it online
Note: now the default training time for object detection models depends on the number of different classes in the training set (1-2 classes: 2 hours, 3-5 classes: 3 hours, 6-10 classes: 6 hours, 11+ classes: 12 hours)
For more information visit our object detection models page to find out how you can get started training your own models on the SentiSight.ai platform. You can download the video tutorial here.
Video Transcription:
Here, you can set the model name, training time, and the stop time which determines for how long the model is going to continue training if there is no improvement. The improvement is measured by mean Average Precision (mAP) which is a common metric in object detection.
The standard training time for an object detection model is significantly longer than for a classification model.
The default training time for object detection models depends on the number of different classes in the training set (1-2 classes: 2 hours, 3-5 classes: 3 hours, 6-10 classes: 6 hours, 11+ classes: 12 hours.
The label count is used to show which labels will be used to train the model. You can unselect any of the tick boxes if you do not want those labels to be used in the object detection model. Some images will contain multiple labels, but in this case, only the selected label will be trained for.
If you change to an advanced view, you can select more advanced parameters. These include;
- Use user-defined validation set
- Use unlabeled images as negative samples
- Change the validation set size percentage
- Model size. We usually recommend selecting large model, as the train time between small, medium and large is negligible, yet the accuracy is often higher for larger models. However, the inference speed is quicker for the smaller models so if your primary concern is inference speed rather than accuracy, you should go for a smaller model.
You can track the progress of your object detection model in the Train models tab. After approximately 20 minutes of training, you can start to view the learning curve. On the left hand graph, you can see the train loss values in blue, and the validation loss values in green. On the right hand graph, you can see the mean Average Precision values for validation in green.
We select the best model by choosing the highest mean average precision value for validation. The model selected is represented by the red dashed line. If you are happy with the chosen model at any stage, you can choose to stop training and keep the current model.
Once the model training is finished, you can view the model performance by clicking on View training statistics. These statistics are divided into Train and Validation. Here you can see many statistics such as Precision, Recall, F1 and mAP. The statistics marked by a * represent measures that depend on the selected score threshold.
In basic view, the Optimised score thresholds are automatically calculated for you. In advanced view, you can set these thresholds yourself.
Users can view the actual predictions by clicking on view predictions. You will be able to see the ground root truth labels in a black bounding box on the top right hand of the box, and the object detection prediction in a blue bounding box with the label on the top left of the box. Only predictions above the prediction threshold will be displayed.
SentiSight also calculates the overlap of the prediction and the ground root truth, called the IoU value (intersection over union). If the IoU value is above a set threshold, typically 50%, then the prediction is judged to be correct, otherwise it is judged to be incorrect. Correct predictions have the text labeled in green, and incorrect predictions are in red text. The actual colour of the bounding box is relative to the colour of the label, not the accuracy of the prediction. Please, notice that sometimes, labeling errors will lead to predictions being displayed as falsely incorrect.
To be considered a correct prediction, the label of the prediction must match the label of the ground root truth bounding box. If they do not match, the IoU is calculated at 0.
You can filter results to show images that are either correct or incorrect, or all, via the Show: filter in the top right. If at least one prediction is incorrect, or a label has been missed, it will count as an incorrect prediction.
In the advanced view for model statistics, you can view the learning curves, set the intersection over union threshold, and to use either optimised or custom thresholds.
The higher you set the score threshold, the lower the amount of predictions you will receive, as only the bounding boxes that exceed these thresholds will be displayed. However, as the threshold is higher, the ratio of correct predictions (precision) will be higher. If you lower the threshold, the recall will be higher, but the precision will be lower.
The precision-recall curve shows the tradeoff between precision and recall for a specific label. You can hover your mouse over any point of the graph to see the specific trade off, as well as detailed figures of F1 and score threshold.
Users can also decide whether to use the best model, or the most recently trained model. The best model is the one which has the highest mean average precision on validation set, whilst the last model is always the last checkpoint of the model.
You can download the predictions on both the train and validation sets. The download will be prepared in the background, and you will be notified when it is ready. Once the download is completed, you can redownload the dataset at any time by first clicking on the download button on the top right hand corner of the screen, and then choosing the model you want to download.
The downloaded zip file will include predictions in JSON format, as well as the images with bounding boxes drawn on them.
You have two options to use the model once it is trained. The first option is to download the model and use it offline, free for a 30 day trial. Thereafter, you will require a licence. Please, note that the offline model requires the linux operating system. The second option is to use the model online, by clicking on the ‘make a new prediction’ on the web interface, or by following the instructions to use the model via REST API.
To use the model, simply upload new images, and the predictions will be automatically made. Users can easily decide whether to use the best or the last model, and whether to use optimised or custom thresholds. You can then download the results as images with bounding boxes, or the results in JSON format.
Use SentiSight.ai Object Detection for yourself
To get started using the our platform for training your very own object detection models, simply register for a SentiSight.ai account and head over to the dashboard to get started!
Summary of Object Detection Model Pricing
SentiSight.ai is supported by a pay-as-you-go wallet based system that allows users to pay for only what they use, maximising flexibility and value for money. New users get €20 of free credits when you sign up for a SentiSight.ai account. Every user receives €5 a month of free credits for use on the platform. There is no need to enter your billing information to receive these free credits. Therefore, the SentiSight.ai platform can be completely free to use if you do exceed the €5 monthly free credit buffer.
The cost to train and use the Object Detection tool are as follows;
Train your Object Detection Model Pricing
| Pricing Range | 0-1,440 minutes | 1,441+ minutes | |
|---|---|---|---|
| 1 Minute Training Time | 0.048 – 0.06 EUR | 0.6 EUR / minute | 0.048 EUR / minute |
Object Detection Model Predictions
| Pricing Range | 1-10,000 Predictions | 10,001-100,000 predictions | 100,000+ predictions | |
|---|---|---|---|---|
| Prediction | 0.0008-0.001 EUR | 0.001 EUR / prediction | 0.0009 EUR / prediction | 0.0008 EUR / prediction |
Each user gets 5GB of disk space for free, with additional disk space available for 1 GB for 0.1 EUR / month.
For full details of SentiSight.ai’s pricing model, including project management features and extra disk space, please visit the Pricing Page.
For more information on how to download an offline version of an object detection model, click here. Please contact us for a custom quote for a model download license.
If you are interested in a managed human workforce for object detection annotation, please contact us.
Contents
- Build your own object detection models to identify and locate objects within images
- Object Detection Models in Three Easy Steps
- The SentiSight.ai platform is simple for beginners, yet powerful for experts
- Use Cases and Industry Applications of Object Detection Models
- Features of the SentiSight.ai Object Detection Tool
- Train your object detection models or use a pre-trained model
- Four different ways to use the Object Detection Tool
- Object Detection Models User Guide
- Use SentiSight.ai Object Detection for yourself