Creating digital content used to mean juggling a collection of specialized tools. You might write an article in one application, design graphics in another, edit a video somewhere else, and spend the afternoon searching for suitable background music. If you also needed a website or a custom automation, you could add a developer to the mix—or prepare yourself for a long evening of tutorials.
Generative AI has changed this process. Today, large language models (LLMs) can help develop ideas and write scripts, image generation models can produce visual concepts, video generators can turn prompts into moving scenes, and AI music tools can create soundtracks for creative projects.
The real opportunity, however, is not simply using these tools individually. It is learning how to connect them into a workflow that saves time, maintains quality, and remains affordable as a project grows.
This tutorial explains how to build a practical AI content creation workflow from scratch. It covers model selection, multimedia generation, unified AI APIs, coding assistants such as Claude Code, and the essential checks that help turn an experimental prototype into a repeatable production process.
Whether you are an independent creator, a startup founder, or a developer building an AI-powered SaaS product, the following steps provide a practical starting point.
Step 1: Define Your Project Before Choosing AI Models
Before opening an AI application or requesting an API key, decide what you want the workflow to accomplish.
This sounds obvious, but it is easy to get distracted by exciting model demonstrations. You might spend an hour generating beautiful images only to discover that your project actually needs a consistent set of product illustrations in specific dimensions.
Start by defining the final deliverable.
For example, suppose you want to create a promotional package for a new SaaS product. Your finished package might include:
- A product introduction and several social media captions.
- A collection of branded images.
- A short promotional video.
- Background music for the video.
- A landing page presenting the product.
- A repeatable process for generating similar packages in the future.
Once these requirements are clear, divide the project into smaller tasks. Each task should have a specific input and a measurable output.
Match Each Task to the Right Model
Different AI models are designed for different purposes. An LLM can help organize information and write copy, while a dedicated image model handles visual generation. Video and music generation introduce their own requirements.
A useful starting workflow looks like this:
| Project stage | AI capability | Expected output |
| Planning | LLM and reasoning | Creative brief and content outline |
| Copywriting | Text generation | Headlines, descriptions, and scripts |
| Visual design | Image generation | Product graphics and visual concepts |
| Video production | Video generation | Short clips or promotional scenes |
| Audio production | Music generation | Background soundtrack |
| Application development | AI coding tools | Website, automation, or application |
| Quality assurance | Human review and automated checks | Approved final assets |
You do not need the most powerful model for every task. A simpler model may be sufficient for short captions, while a more capable model could be useful for complex planning or detailed technical analysis.
The goal is to choose models according to the job rather than treating every request as if it requires the same level of intelligence.
Step 2: Use an LLM to Create a Structured Content Brief
Once the project is defined, begin with text. A clear content brief makes every subsequent generation step easier because it gives the different models a consistent creative direction.
Ask an LLM to identify the target audience, main message, desired tone, visual style, and intended publishing channels.
For example, a prompt for a product launch might look like this:
Act as a creative strategist for a small SaaS company. Develop a promotional concept for a new productivity application aimed at independent professionals. Provide a central message, three campaign headlines, a short video script, a visual direction, and a suggested soundtrack mood. Keep the tone approachable, practical, and modern.
This prompt gives the model a defined role, a specific audience, and a clear set of deliverables.
Turn the Brief Into Reusable Instructions
Do not stop after receiving the first response. Ask the model to organize the result into a structured document that can be reused throughout the project.
Your brief should contain the following information:
- Audience: Who is the content intended for?
- Message: What should viewers remember?
- Tone: Should the content feel playful, professional, dramatic, or educational?
- Visual direction: What colors, environments, subjects, and composition should appear?
- Video direction: What happens in each scene?
- Audio direction: What atmosphere should the soundtrack create?
- Restrictions: Which elements must be avoided or remain consistent?
This document becomes the reference point for the rest of the workflow.
If the project changes direction, update the brief first. Doing so is usually more efficient than generating a collection of assets and then trying to make them fit an entirely new concept.
Step 3: Generate Images That Follow the Creative Brief
With the content brief ready, move to AI image generation.
Image models can help create product mockups, illustrations, promotional graphics, storyboards, and visual references. They are particularly useful during early experimentation because you can explore multiple creative directions without producing every concept manually.
Write Better Image Prompts
A practical image prompt should describe the subject, environment, composition, lighting, style, and intended use.
For example:
Create a clean promotional image for a productivity application. Show a freelancer working at a desk in a bright, modern home office. Use a balanced composition, natural lighting, subtle blue accents, and a calm, contemporary visual style. Leave clear space on the right for a headline. Avoid visible brand names and unnecessary text.
Notice that the prompt describes more than the subject. It also explains how the image will be used.
Generate a few variations, compare their composition, and select the strongest direction before creating additional assets.
Maintain Visual Consistency
One of the biggest challenges in AI content creation is producing several assets that look as though they belong to the same campaign.
To improve consistency, reuse important details from the original brief. These may include the color palette, lighting style, character descriptions, environment, and composition.
Where supported, use reference images or image-editing features to preserve key visual elements.
Do not assume that a model will remember the exact appearance of a subject from a previous, unrelated generation request. Provide the relevant references and instructions explicitly.
Finally, inspect the results. Check for distorted objects, incorrect text, inconsistent branding, and visual details that might confuse the audience.
Step 4: Turn Your Visual Concepts Into AI-Generated Video
Once the images and creative direction are approved, you can begin producing video.
AI video generation can help create short advertisements, product teasers, social media clips, and animated scenes. It is especially useful when traditional filming would require equipment, locations, actors, or additional production time.
However, a good video workflow requires more planning than simply entering a paragraph into a generator.
Break the Video Into Individual Scenes
Start by dividing the script into short scenes. Each scene should communicate one idea and have a clear visual purpose.
For a 20-second promotional video, you might use four scenes:
- Introduce the problem your audience faces.
- Show the product or its key benefit.
- Demonstrate how the product improves the situation.
- End with the main message and a call to action.
For each scene, specify the subject, setting, movement, camera direction, and approximate duration.
For example:
A freelancer looks at an overcrowded desk and several unfinished tasks. The camera slowly moves closer as the person opens a clean productivity dashboard. The lighting becomes brighter, creating a sense of clarity and relief.
Generate the scenes separately if that approach provides better control. Review the results before assembling them into a complete video.
Edit Rather Than Accepting Every First Attempt
AI-generated footage may contain inconsistent subjects, unnatural movement, or transitions that do not match the script.
Choose the strongest clips, trim unnecessary sections, and use conventional editing tools where needed. Add subtitles, branding, and calls to action during the editing stage if the video model does not handle them reliably.
For many projects, combining several short generated clips is more predictable than asking a model to produce a polished advertisement in one attempt.
Step 5: Add Music That Matches the Content
Music can dramatically change how an audience experiences a video. A product demonstration with energetic electronic music communicates a different mood from the same video accompanied by gentle piano.
AI music generation allows creators to explore these differences quickly.
Start by defining the role of the soundtrack. Should it create excitement, provide a relaxed background, build suspense, or support an emotional story?
A useful music prompt might be:
Create an upbeat electronic instrumental for a short technology product advertisement. Use a clean modern sound, a steady rhythm, and a positive sense of momentum. Keep the arrangement suitable for a 20-second promotional video and leave room for spoken narration.
If the first result feels too intense or too slow, adjust the tempo, instrumentation, or mood rather than rewriting the entire creative brief.
Check the Relationship Between Music and Video
A soundtrack should support the video’s pacing rather than compete with it.
Listen for changes in energy, scene transitions, and moments when narration needs to remain clear. Adjust the soundtrack volume and edit points to create a coherent result.
Also, review the applicable licensing and commercial-use terms before publishing AI-generated music in advertisements or monetized content.
The same principle applies to images and videos: technical ability to generate an asset does not automatically establish that every intended use is permitted.
Step 6: Simplify Model Access With a Unified AI API
So far, the workflow has involved several creative tasks. If you are producing content manually, separate applications may be sufficient. But developers building an automated system need another piece of the puzzle: a reliable way to connect the required models.
This is where a unified AI API can help.
Instead of maintaining a completely separate integration for every provider, a unified interface can offer access to multiple supported models through a common API structure. Depending on the platform, developers may be able to experiment with language, image, video, and music models within the same integration environment.
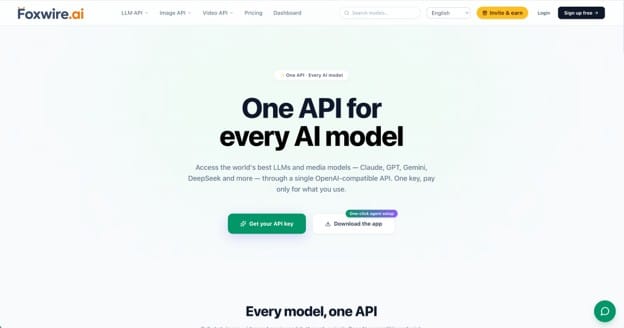
One platform to investigate is foxwire.ai, which offers a unified, OpenAI-compatible API for multiple AI models, including supported text and media generation models. Its usage-based billing and shared account balance can be useful for teams experimenting with different models and managing consumption across supported services.
How to Plan a Multi-Model Integration
Before writing code, list the models and operations your application needs.
For example, an automated marketing workflow might require:
- A text-generation request to develop a campaign brief.
- An image-generation request to produce a visual concept.
- A video-generation request to create a short clip.
- A music-generation request to prepare a soundtrack.
Check the API documentation for each required capability. Confirm the authentication process, model identifiers, supported input parameters, output formats, and any asynchronous processing requirements.
A common interface can simplify model access, but it does not mean every model accepts identical parameters or returns identical results.
Make Model Switching Configurable
Avoid hard-coding model choices throughout your application.
Instead, organize model settings in a configuration layer. This makes it easier to test alternative models without changing unrelated application logic.
For example, you might compare two language models on the same content brief and evaluate their output quality, response time, and cost.
Record the results using representative tasks. A model that performs well on a short promotional caption may not be the best choice for a long technical document.
Monitor Costs From the Beginning
Usage-based billing is easier to manage when you understand how much each complete workflow costs.
Track the expenses associated with text generation, image creation, video generation, retries, and other operations. Media-generation tasks may use different billing units, so compare the actual pricing rules for the models you intend to use.
Set usage limits where appropriate and avoid generating expensive assets before the underlying creative concept has been approved.
These steps help prevent an inexpensive prototype from becoming an unexpectedly costly production system.
Step 7: Use an Integrated AI Workspace for Faster Experimentation
Not every workflow needs to begin with custom API development.
For creators who prefer conversational interaction, an integrated AI workspace can provide a more accessible way to develop ideas and experiment with multiple content formats.
Rather than manually coordinating every step across different applications, users can begin with a conversation, refine their instructions, and explore available generation capabilities.
For example, a creator might discuss a campaign concept, generate an image that illustrates the idea, explore a short video, and develop a soundtrack that matches the intended mood.
A platform such as sozdai.ai brings together AI conversation and multimedia creation capabilities, including image, video, and music generation. Its developer API offering also provides a potential route for integrating supported generation features into custom applications.

When Should You Use a Workspace Instead of Building Everything Yourself?
An integrated workspace is a reasonable starting point when you are exploring an idea, creating occasional assets, or learning which generation capabilities your project actually needs.
A custom API workflow becomes more attractive when you need repeatable processing, integration with your own application, automated task execution, or greater control over how requests and outputs are handled.
These approaches are not mutually exclusive. You can use an accessible creative interface to explore concepts before deciding which steps are worth automating.
Before relying on a platform for production, verify its available models, usage limits, API documentation, pricing, and the specific features exposed to developers.
Step 8: Use Claude Code and Other AI Developer Tools to Automate Repetitive Work
If you plan to turn your workflow into a web application or internal tool, AI coding assistants can help accelerate development.
Claude Code is one example of a coding assistant designed to work with software projects through a terminal-oriented workflow. It can assist developers with understanding codebases, implementing changes, investigating errors, and working through multi-step coding tasks.
Other AI developer tools may offer code completion, repository analysis, test generation, or editor integrations.
Build a Small Automation Before Building a Large Platform
Start with one repetitive task.
For example, you could build a small application that accepts a product description and generates three campaign concepts. Once the text-generation stage works reliably, you could add image generation and save the resulting assets.
A coding assistant can help draft the application structure, connect API requests, and write tests. Ask it to work in small, reviewable steps instead of requesting an entire production system in one enormous prompt.
A useful development sequence is:
- Create the basic interface.
- Add one API integration.
- Validate the response and display the result.
- Add error handling and usage logging.
- Test the workflow with representative inputs.
- Introduce additional generation capabilities one at a time.
This makes problems easier to identify and reduces the risk of breaking working components as the application grows.
Keep Human Review in the Loop
AI-generated code can contain mistakes, security vulnerabilities, or assumptions that do not fit your application.
Review code changes, use version control, run automated tests, and protect API credentials. Keep secrets out of public frontend code and validate any user-supplied inputs before passing them to external services.
The purpose of a coding assistant is to accelerate implementation, not remove the need for engineering judgment.
Step 9: Create a Repeatable Quality-Control Process
A workflow is not complete simply because it can generate content.
Before publishing or delivering the final result, establish a checklist that covers both the individual assets and the complete project.
Review the Text
Check factual accuracy, grammar, tone, and whether the content addresses the intended audience. If the material includes technical claims, verify them against reliable documentation.
Review the Visuals
Check image quality, visual consistency, unwanted artifacts, text accuracy, and brand requirements. Confirm that each asset has the correct dimensions for its destination.
Review the Video and Audio
Watch the complete video rather than checking only a few frames. Look for inconsistent subjects, awkward transitions, and pacing problems. Listen for audio clipping, unsuitable music levels, and conflicts between narration and the soundtrack.
Review the Complete Workflow
Measure the time required to produce a finished package, the number of revisions needed, and the cost of the successful result.
These measurements help determine whether automation is genuinely improving productivity.
A workflow that generates many assets but requires extensive manual correction may not be as efficient as a smaller workflow that consistently produces usable results.
Step 10: Improve the Workflow Based on Real Results
Once the basic process works, optimize it gradually.
Start by identifying the stage that consumes the most time or money. If writing is slow, test different LLMs or improve the brief. If image generation produces inconsistent results, refine the reference inputs. If video generation requires too many retries, simplify the scenes or adjust the prompts.
Avoid changing every component simultaneously. Otherwise, it becomes difficult to understand which modification improved the outcome.
For SaaS teams, the next step may be adding a job queue, usage limits, asset storage, or a review interface. For individual creators, it may simply involve saving successful prompts and organizing reusable project templates.
The best improvements are those that address a measurable problem rather than adding complexity for its own sake.
Final Thoughts: Build a Workflow, Not Just a Collection of AI Tools
Generative AI offers creators and developers an expanding set of capabilities, but the practical value comes from using them in a coordinated way.
Start with a clear project brief. Select models according to the task. Generate text, images, video, and music in manageable stages. Use unified APIs when multiple integrations become difficult to maintain, and consider integrated creative workspaces when ease of experimentation matters more than custom infrastructure.
If software development is part of the project, coding assistants can help turn a manual process into a repeatable application. Just remember that reliability, security, quality control, and cost management remain essential.
You do not need to automate everything on day one. Begin with one useful workflow, measure the results, and expand only when there is a clear benefit.
That approach makes AI content creation less about chasing every new model and more about building a practical system that helps you create better work with the time and resources you actually have.